Getting away from the Java "homeland" to a new language like Python is always challenging. Besides leaning the new syntax and framework, I've found myself stuck in choosing a productive IDE for Django development. TextMate is cool on Mac but it's not free. Vi and Emacs are strong for open source development, but it's also quite intimidating to setup, and I don't have time to divert my energy to get fluent with another IDE. I'm more interested in learning a new language and framework rather than an IDE. Coming from the Java background, it feels natural for me to work on Eclipse with a Python plugin. So I chose PyDev.
As for Pinax, it provides a collection of often-used features/apps for Django development. It is built on top of Django and 100% Django.
Pinax recommends to use virtualenv or virtualenvwrapper to isolate Python development environments, so each project can have its own libraries and dependencies, and won't affect other projects. I wrote a blog about setting up virtualenv and virtualenvwrapper on Mac if you're interested (Install pip, virtualenv, and virtualenvwrapper on Mac OS X 10.6.4).
Let's setup PyDev with Pinax and virtualenv.
PyDev plugin
I already had Eclipse installed for Java on Macbook Pro. So I just need to install PyDev plugin for Eclipse. If you haven't installed Eclipse yet, download it at: http://www.eclipse.org/downloads/?osType=macosx. I'd recommend downloading "Eclipse IDE for Java Developers" even if you don't code Java.
Untar the downloaded archive.
tar -xvf eclipse_xyz.tar.gz
Copy the "eclipse" directory to the "Application" folder, and you finished installing Eclipse.
To install PyDev plugin, select "Help->Install New Software ..." menu in Eclipse, and add PyDev update site: http://pydev.org/updates
Check the "PyDev" node and its child "PyDev for Eclipse". Click through "next" and "finish" buttons. Eclipse will resolve all dependencies and install PyDev plugin.
Setup PyDev
Stackoverflow.com already has some useful information on this topic:
The most helpful link is Vlku's screencast. Make sure you watch it, however, please also notice the following highlights:
1. For each virtual environment, you need to add a Python interpreter, and point to the correct python executable. To find out the full path of the python executable, first you need to activate the virtual environment:
workon pinax-env
Replace "pinax-env" with your virtual env name. Then, type:
which python
This will give you the full path of the python executable used by your virtual env.
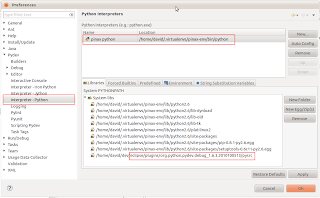
Go to "Window -> Preferences -> PyDev -> Interpreter - Python". In the right pane, select the "New" button, and copy this path to the "Interpreter Executable" text box. PyDev will resolve all libraries after you press "OK".
2. PyDev will resolve libraries and list them in PYTHONPATH. You don't need to manually change the PYTHONPATH list unless the library you want to use is missing. Here I include the PyDev debug plugin at eclipse/plugins/org.python.pydev.debug_1.6.3.2010100513/pysrc. This plugin is used to debug Python programs.
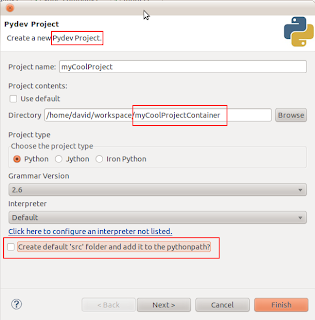
3. When you create a project in PyDev, make sure it is a "PyDev project", and the project directory should be one level up above the actual project folder. For example, your project folder is "myCoolProject" under "~/workspace" directory. You can create a new directory under "~/workspace", and give it a name something like "myCoolProjectContainer". Move the "myCoolProject" folder to the "myCoolProjectContainer" directory. When you create a PyDev project, select "myCoolProjectContainer" as the project folder instead of "myCoolProject".
4. Uncheck the "Create default src folder and add it to the pythonpath" option in the project creation dialog box.
5. After the project is created, right click on the project node in "Pydev Package Explorer" and select "Properties". Go to "Pydev - PYTHONPATH", in the "Source Folders" tab, add the entire project as source folder.
6. To debug, in the "Debug Configuration" dialog box, add a new Python Run (e.g., "Debug myCoolProject").
In the "Main" tab, select "manage.py" in "Main Module".
In the "Arguments" tab, add "runserver" in the "Program arguments" text box.
Now this is important, in the "Working directory" field, check "Other" and point to the actual project directory. If you follow the example above, it will be "myCoolProject" instead of "myCoolProjectContainer" folder.
This is also important: in the "Interpreter" tab, make sure you select the correct interpreter. It should be the interpreter that you configured specially for the working virtual env.
7. To enable python debug, right click on the current perspective icon, and "customize". Select the "Command Groups Availability" tab. Check "PyDev Debug". This will put two buttons on your action bar:
- stop the debugger server
- start the pydev server
When you debug, activate "start the pydev server", and then select the debug configuration in the Debug drop down (for our example, it will be "Debug myCoolProject").
8. Vlku's screencast suggests using a special manage.py to set break points for debug. I'm not so into changing the standard manage.py. I found putting the following line in code to set breakpoints are equivalently effective.
import pydevd; pydevd.settrace()
The program will stop at the next line of the above code, and from that line, you can inspect all variables, step over, and do all the debug stuff you want.
Following the Vlku screencast and these notes, I successfully configured PyDev to work with Pinax and virtualenv on Mac. Hope this helps.

