Showing posts with label mac. Show all posts

Sunday, April 24, 2011

MacVim setup for Python programming

There are already tons of blogs about setting up vim for Python programming. I've been going through these excellent articles this weekend. This blog is to record what steps I took to set up my own MacVim with Python.

(Disclaimer: In order to put together information from all different sources, I shamelessly copied/pasted content from other blogs. I'd try my best to give credit back to the authors by adding links to their original sources.)

MacVim as Python IDE

Install MacVim with Python


Either of the following two options can be used to install MacVim.

Option 1: Through Mac ports

Make sure Mac ports are the latest.

$ sudo port -v selfupdate

Install MacVim with Python.

$ sudo port install macvim +cscope +python26

(Source: Pietra's technical journals)

Option 2: "Make" your own

$ git clone git://github.com/b4winckler/macvim.git
$ cd macvim/src
$ ./configure --enable-pythoninterp --with-macsdk=10.6
$ make

To install MacVim, type:

$ open MacVim/build/Release

and drag the MacVim icon into your /Applications folder.

(source: MacVim Github)

Add the following to ~/.profile or ~/.bash_profile.

alias vim=/Applications/MacVim.app/Contents/MacOS/Vim

To test if MacVim has python integrated, type

:python print "Hello, world!"

in MacVim. It should respond "Hello, world!".

Look and feel


The default MacVim color scheme isn't that appealing. I found dark background is easier for my eyes. Light background could put a strain on my eyes after staring at screen more than one hour.

To install a color scheme, first, create a directory:

$ mkdir ~/.vim/colors

Then, go here for a list of color schemes. Download the *.vim file, and put it to the ~/.vim/colors directory.

The Lucius color scheme with dark background is amazingly beautiful. This color scheme also supports light and blue themes.

Move lucius to the colors directory. Edit .vimrc to turn on syntax highlighting and set color scheme:

$ mv lucius.vim ~/.vim/colors
$ vi ~/.vimrc

set nocompatible

syntax on
colorscheme lucius
"colorscheme mustang
set background=dark

Now, open MacVim to try it out. You can switch among dark, light, and blue themes by typing :LuciusLight, :LuciusDark, and :LuciusBlue individually in MacVim.

Lucius light

(Mustang2 is another great color scheme with dark background. You can find it here. For some people, if macvim cannot find mustang, you might need to rename Mustang.vim to mustang.vim.)

As for font, I prefer Monaco in size 12.

set gfn=Monaco:h12

Here are some other settings for tab, indent, search, and line numbers:

set tabstop=4
set shiftwidth=4
set expandtab
set softtabstop=4
set smartindent
set autoindent

set hlsearch
set incsearch
set showmatch

set number

Open new files in tabs


By default, "vi a_new_file" in terminal will open a new MacVim window. You might want to put the newly the opened file in a new tab.

Edit mvim:

$ vi /opt/local/bin/mvim

Add the following line at the top of the file below the comments.

tabs=true

And replace the if structure at the bottom of the file with the following:

# Last step:  fire up vim.
if [ "$gui" ]; then
  if $tabs && [[ `$binary --serverlist` = "VIM" ]]; then
    exec "$binary" -g $opts --remote-tab-silent ${1:+"$@"}
  else
    exec "$binary" -g $opts ${1:+"$@"}
  fi
else
  exec "$binary" $opts ${1:+"$@"}
fi

Use <gt> to switch tabs.

(Source: Web Expose)
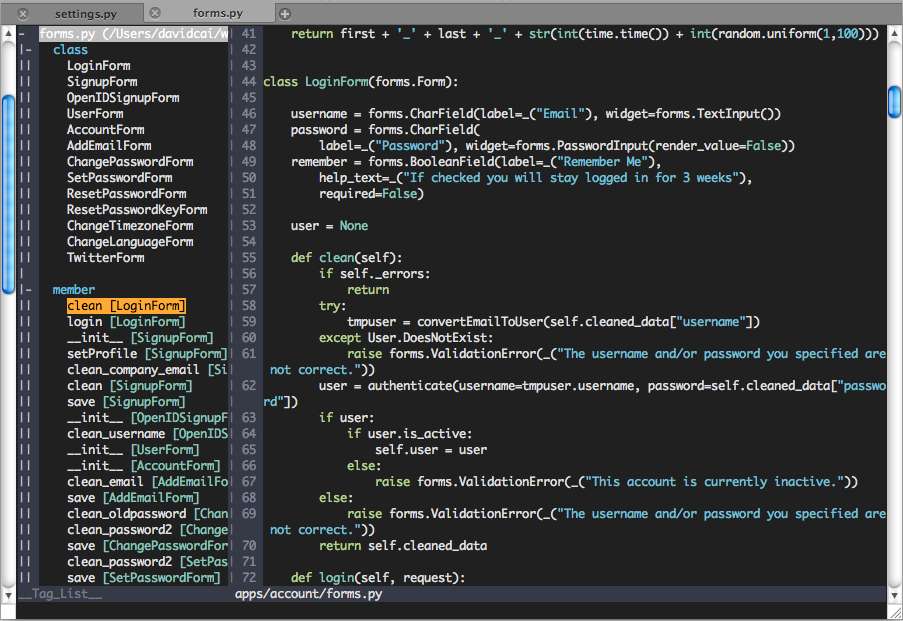
CTags and Tag List


CTags and Tag list give you an outline of classes, members, and functions in a left-side panel. Quite handy for code navigation.

Install ctags:

$ port install ctags

Install taglist:

Download here. Copy taglist.vim to ~/.vim/plugin

Add these two lines in ~/.vimrc to turn on file type detection.

filetype on
filetype plugin on

Run ctags on your project folder to generate a tags file which contains locations of classes, members, and functions in your project. For example, here we generate a tags file for all python source code in the "my_django_project" directory and its sub-directories.

$ cd my_django_project
$ ctags -R *.py


Please notice: if you already have a directory with a exact same name as "tags" under "my_django_project", you will get a "ctags: Failure on attempt to read file : Is a directory" error message. You can either rename your "tags" directory to something else, or change the location where the tags file will be generated. This is not within the scope of this blog but you can find more details here.

ctags can be configured to skip indexing certain types of code. The following command has ctags skip indexing python import statements.

$ ctags -R --python-kinds=-i *.py

To see what else can be skipped, type:

$ ctags --list-kinds=python

In ~/.vimrc, bind F8 to ctags command so we can re-generate tags on the fly.

nnoremap <F8> :!/opt/local/bin/ctags -R --python-kinds=-i *.py<CR>

In MacVim, type :TlistToggle to open the tag list. Use <C-ww> to switch between windows, <C-]> to jump to tag when the cursor is over a word, and <C-t> to go back. Pressing <space> on a function name in the tag list shows the function signature. For a full list of tag list key bindings, check out this blog.

I bound F4 to :TlistToggle.

nnoremap <F4> :TlistToggle<CR>

If you'd like to open tag list on right, add this line to ~/.vimrc:

let Tlist_Use_Right_Window = 1

Omni Complete


If you ever used Visual Studio, Eclipse, or other modern IDEs, you probably already knew what Omni Complete does. Omni Complete is the equivalent IntelliSense or code autocomplete for vim.

Add this line to ~/.vimrc to enable omni complete for python.

autocmd FileType python set omnifunc=pythoncomplete#Complete

The key combo () to toggle omni complete is quite awkward. Here I changed it to .

inoremap <C-space> <C-x><C-o>

OmniComplete

Task list


It is a common practice for programmers to mark TODO and FIXME in code. The TaskList plugin shows a list of such marks.

Download it here. Copy the vim file to ~/.vim/plugin

Type :TaskList to open the list.

Task list showing TODO

Pyflakes


Pyflakes analyzes Python programs and detects various errors. It is a must-have plugin for me.

Download the plugin here. Unzip it to ~/.vim/

$ unzip pyflakes-vim.zip -d ~/.vim/

PyFlakes

SnipMate


One of TextMate's cool features is snippet. Type "for" then press the <tab> key, a block of for statement is automatically generated. Vim can have the same feature with the SnipMate plugin.

Download the plugin here. Unzip it to ~/.vim/

This video demonstrates SnipMate in action.

FuzzyFinder


Another extremely useful plugin. What does it do? See it your self: video.
You can download it here. The L9 library is also required because FuzzyFinder depends on it.

Type :FufFile to search in files. I added the following line in ~/.vimrc to bind <C-f><C-f> to :FufFile.

nnoremap <C-f><C-f> :FufFile<CR>

In FuzyFinder, type <CR> to jump to deeper directories or open a selected file in the current tab. Type <C-l> to open selected file in a new tab. For more details of FuzzyFinder usage, go here.


NERDTree


"The NERD tree allows you to explore your filesystem and to open files and
directories. It presents the filesystem to you in the form of a tree which you
manipulate with the keyboard and/or mouse. It also allows you to perform
simple filesystem operations." (Marty Grenfell, vim.org)

Type :NERDTreeToggle to open/close NERD Tree.

In NERDTree, type t to open the file in a new tab. Type :Bookmark to set a bookmark on a file or directory. <B> will open or hide a list of all bookmarks. In the bookmark list, type D to delete a selected bookmark. Type <C> on a directory will change the current working directory to that directory. More commands can be found in this article.

I bound the command to F3:

nnoremap <F3> :NERDTreeToggle<CR>

MatchIt


MatchIt is a handy plugin that lets you jump from a opening tag to its paired closing tag, and vice versa. To see it in action, check out MrTutcasts's awesome video.

Download it here. Unzip it to ~/.vim/

Move your cursor to a HTML tag, e.g. <div>, then type %. The cursor will jump to its closing </div> tag.

Save your fingers


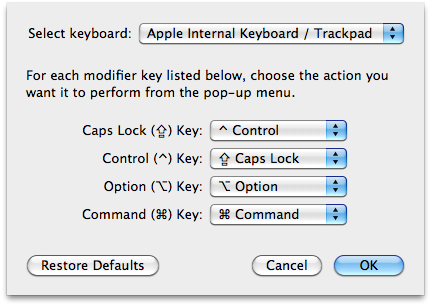
All these wonderful plugins involve a lot of strokes on the Ctrl key. To make your typing more pleasant, it is recommended to swap Caps lock with the control key.

Change the key bindings at System Preferences -> Keyboard -> Modify keys.


Other interesting vim plugins


tComment: toggle comments on one or more lines.
MRU: list most recently used files.
SearchComplete: Tab to complete search words in / search.
SuperTab: Tab to activate auto completion.

Monday, December 13, 2010

PyDev setup for Django and Pinax development on Mac OS

Java is the primary language that I've been using on a daily basis for the past 6 years. Lately, I decided to try out Python and its web framework Django, just to keep my mind sharp and fresh.

Getting away from the Java "homeland" to a new language like Python is always challenging. Besides leaning the new syntax and framework, I've found myself stuck in choosing a productive IDE for Django development. TextMate is cool on Mac but it's not free. Vi and Emacs are strong for open source development, but it's also quite intimidating to setup, and I don't have time to divert my energy to get fluent with another IDE. I'm more interested in learning a new language and framework rather than an IDE. Coming from the Java background, it feels natural for me to work on Eclipse with a Python plugin. So I chose PyDev.

As for Pinax, it provides a collection of often-used features/apps for Django development. It is built on top of Django and 100% Django.

Pinax recommends to use virtualenv or virtualenvwrapper to isolate Python development environments, so each project can have its own libraries and dependencies, and won't affect other projects. I wrote a blog about setting up virtualenv and virtualenvwrapper on Mac if you're interested (Install pip, virtualenv, and virtualenvwrapper on Mac OS X 10.6.4).

Let's setup PyDev with Pinax and virtualenv.

PyDev plugin


I already had Eclipse installed for Java on Macbook Pro. So I just need to install PyDev plugin for Eclipse. If you haven't installed Eclipse yet, download it at: http://www.eclipse.org/downloads/?osType=macosx. I'd recommend downloading "Eclipse IDE for Java Developers" even if you don't code Java.

Untar the downloaded archive.

tar -xvf eclipse_xyz.tar.gz

Copy the "eclipse" directory to the "Application" folder, and you finished installing Eclipse.

To install PyDev plugin, select "Help->Install New Software ..." menu in Eclipse, and add PyDev update site: http://pydev.org/updates


Check the "PyDev" node and its child "PyDev for Eclipse". Click through "next" and "finish" buttons. Eclipse will resolve all dependencies and install PyDev plugin.

Setup PyDev


Stackoverflow.com already has some useful information on this topic:

The most helpful link is Vlku's screencast. Make sure you watch it, however, please also notice the following highlights:


1. For each virtual environment, you need to add a Python interpreter, and point to the correct python executable. To find out the full path of the python executable, first you need to activate the virtual environment:

workon pinax-env

Replace "pinax-env" with your virtual env name. Then, type:

which python

This will give you the full path of the python executable used by your virtual env.

Go to "Window -> Preferences -> PyDev -> Interpreter - Python". In the right pane, select the "New" button, and copy this path to the "Interpreter Executable" text box. PyDev will resolve all libraries after you press "OK".


2. PyDev will resolve libraries and list them in PYTHONPATH. You don't need to manually change the PYTHONPATH list unless the library you want to use is missing. Here I include the PyDev debug plugin at eclipse/plugins/org.python.pydev.debug_1.6.3.2010100513/pysrc. This plugin is used to debug Python programs.


3. When you create a project in PyDev, make sure it is a "PyDev project", and the project directory should be one level up above the actual project folder. For example, your project folder is "myCoolProject" under "~/workspace" directory. You can create a new directory under "~/workspace", and give it a name something like "myCoolProjectContainer". Move the "myCoolProject" folder to the "myCoolProjectContainer" directory. When you create a PyDev project, select "myCoolProjectContainer" as the project folder instead of "myCoolProject".


4. Uncheck the "Create default src folder and add it to the pythonpath" option in the project creation dialog box.


5. After the project is created, right click on the project node in "Pydev Package Explorer" and select "Properties". Go to "Pydev - PYTHONPATH", in the "Source Folders" tab, add the entire project as source folder.


6. To debug, in the "Debug Configuration" dialog box, add a new Python Run (e.g., "Debug myCoolProject").

In the "Main" tab, select "manage.py" in "Main Module".

In the "Arguments" tab, add "runserver" in the "Program arguments" text box.

Now this is important, in the "Working directory" field, check "Other" and point to the actual project directory. If you follow the example above, it will be "myCoolProject" instead of "myCoolProjectContainer" folder.

This is also important: in the "Interpreter" tab, make sure you select the correct interpreter. It should be the interpreter that you configured specially for the working virtual env.


7. To enable python debug, right click on the current perspective icon, and "customize". Select the "Command Groups Availability" tab. Check "PyDev Debug". This will put two buttons on your action bar:

- stop the debugger server
- start the pydev server

When you debug, activate "start the pydev server", and then select the debug configuration in the Debug drop down (for our example, it will be "Debug myCoolProject").


8. Vlku's screencast suggests using a special manage.py to set break points for debug. I'm not so into changing the standard manage.py. I found putting the following line in code to set breakpoints are equivalently effective.

import pydevd; pydevd.settrace()

The program will stop at the next line of the above code, and from that line, you can inspect all variables, step over, and do all the debug stuff you want.


Following the Vlku screencast and these notes, I successfully configured PyDev to work with Pinax and virtualenv on Mac. Hope this helps.

Wednesday, August 25, 2010

Install pip, virtualenv, and virtualenvwrapper on Mac OS X 10.6.4

I decide to remove the python pre-installed on Mac, and install python with the version I want, so I remove everything under /Library/Frameworks/Python.framework/

Now, install python26, tcl and pip. Tcl is one of Pip's required packages. The port tool is supposed to download and install tcl when I install pip. However, in my case, port took forever to download tcl. So I had to intall tcl separately before installing pip, just to make the dependents resolved.

sudo port install python26
sudo port install tcl
sudo port install py26-pip

To see where these ports are installed, run port location , e.g.:

port location python26

MacPorts are installed as images. See the following quote from MacPorts.org (http://guide.macports.org/chunked/internals.images.html)

"""
MacPorts port by default is not installed into its final or "activated" location, but rather to an intermediate location that is only made available to other ports and end-users after an activation phase that makes hard links of all its files in ${prefix} that point to the port's files in the image repository. Therefore deactivating a port image to install a different version only removes the hard links in ${prefix} pointing to the previous port version's image -- the deactivated port's image is not disturbed.
"""

(If you are curious about where ${prefix} is defined, open /opt/local/etc/macports/macports.conf, and check "prefix".)

To clean work files, distribution files, and archives, run port clean --all . For example:

sudo port clean --all python26

Create a symbolic link to pip-2.6 so that we can simply type pip instead of pip-2.6:

sudo ln -s /opt/local/bin/pip-2.6 /opt/local/bin/pip

If you check pip-2.6, it's a symbolic link that points to /opt/local/Library/Frameworks/Python.framework/Versions/2.6/bin/pip

/opt/local/Library/Frameworks is defined in macports.conf as "frameworks_dir".

Install virtualenv and virtualenvwrapper

sudo pip install virtualenv
sudo pip install virtualenvwrapper

Create a symbolic link to virtualenv

sudo ln -s /opt/local/Library/Frameworks/Python.framework/Versions/2.6/bin/virtualenv /opt/local/bin/virtualenv

Create a directory to hold the virtual environments.

mkdir ~/.virtualenvs

Add the following two lines in ~/.profile

export WORKON_HOME=$HOME/.virtualenvs
source /opt/local/Library/Frameworks/Python.framework/Versions/2.6/bin/virtualenvwrapper.sh

After editing it, reload the startup file (e.g., run: source ~/.profile).

Create a virtual environment, e.g. "testenv".

mkvirtualenv testenv

A directory "testenv" will be created under ~/.virtualenvs, which hosts the isolated virtual environment. It creates a testenv/lib/python2.6/site-packages directory, where any libraries you install will go. In a minute, I will talk how to install libraries in a virtual environment.

The above command will install a virtual environment that inherits any libraries from your existing python installation's directory. If you want to create a environment without inherits, just add --no-site-packages before the virtual environment name. You may need that when you can't change packages under the python installation's site-packages directory. For more information, see --no-site-packages on virtualenv.openplans.org.

It will also install Setuptools for you. If you use the --distribute option, it will install distribute instead.

mkvirtualenv --no-site-packages --distribute testenv

To see all virtual environments, type workon without any option.

workon

Switch to testenv

workon testenv

If you want to delete testenv, you need to deactivate and then remove it.

deactivate
rmvirtualenv testenv

To install a package to a virtual environment, use pip and the -E option.

pip install -E yourvirtualenv yourpackage

Yolk is a convenient tool to list packages used in your virtual environment. Install yolk:

pip install -E testenv yolk

To list packages used in a virtual environment, you need to activate the environment if it's inactive, and type yolk -l

workon testenv
yolk -l


References