(Disclaimer: In order to put together information from all different sources, I shamelessly copied/pasted content from other blogs. I'd try my best to give credit back to the authors by adding links to their original sources.)
MacVim as Python IDE
Install MacVim with Python
Either of the following two options can be used to install MacVim.
Option 1: Through Mac ports
Make sure Mac ports are the latest.
$ sudo port -v selfupdate
Install MacVim with Python.
$ sudo port install macvim +cscope +python26
(Source: Pietra's technical journals)
Option 2: "Make" your own
$ git clone git://github.com/b4winckler/macvim.git
$ cd macvim/src
$ ./configure --enable-pythoninterp --with-macsdk=10.6
$ make
To install MacVim, type:
$ open MacVim/build/Release
and drag the MacVim icon into your /Applications folder.
(source: MacVim Github)
Add the following to ~/.profile or ~/.bash_profile.
alias vim=/Applications/MacVim.app/Contents/MacOS/Vim
To test if MacVim has python integrated, type
:python print "Hello, world!"
in MacVim. It should respond "Hello, world!".
Look and feel
The default MacVim color scheme isn't that appealing. I found dark background is easier for my eyes. Light background could put a strain on my eyes after staring at screen more than one hour.
To install a color scheme, first, create a directory:
$ mkdir ~/.vim/colors
Then, go here for a list of color schemes. Download the *.vim file, and put it to the ~/.vim/colors directory.
The Lucius color scheme with dark background is amazingly beautiful. This color scheme also supports light and blue themes.
Move lucius to the colors directory. Edit .vimrc to turn on syntax highlighting and set color scheme:
$ mv lucius.vim ~/.vim/colors
$ vi ~/.vimrc
set nocompatible

syntax on
colorscheme lucius
"colorscheme mustang
set background=dark
Now, open MacVim to try it out. You can switch among dark, light, and blue themes by typing :LuciusLight, :LuciusDark, and :LuciusBlue individually in MacVim.
Lucius light
(Mustang2 is another great color scheme with dark background. You can find it here. For some people, if macvim cannot find mustang, you might need to rename Mustang.vim to mustang.vim.)
As for font, I prefer Monaco in size 12.
set gfn=Monaco:h12
Here are some other settings for tab, indent, search, and line numbers:
set tabstop=4
set shiftwidth=4
set expandtab
set softtabstop=4
set smartindent
set autoindent

set hlsearch
set incsearch
set showmatch

set number
Open new files in tabs
By default, "vi a_new_file" in terminal will open a new MacVim window. You might want to put the newly the opened file in a new tab.
Edit mvim:
$ vi /opt/local/bin/mvim
Add the following line at the top of the file below the comments.
tabs=true
And replace the if structure at the bottom of the file with the following:
# Last step:  fire up vim.
if [ "$gui" ]; then
  if $tabs && [[ `$binary --serverlist` = "VIM" ]]; then
    exec "$binary" -g $opts --remote-tab-silent ${1:+"$@"}
  else
    exec "$binary" -g $opts ${1:+"$@"}
  fi
else
  exec "$binary" $opts ${1:+"$@"}
fi
Use <gt> to switch tabs.
(Source: Web Expose)
CTags and Tag List
CTags and Tag list give you an outline of classes, members, and functions in a left-side panel. Quite handy for code navigation.
Install ctags:
$ port install ctags
Install taglist:
Download here. Copy taglist.vim to ~/.vim/plugin
Add these two lines in ~/.vimrc to turn on file type detection.
filetype on
filetype plugin on
Run ctags on your project folder to generate a tags file which contains locations of classes, members, and functions in your project. For example, here we generate a tags file for all python source code in the "my_django_project" directory and its sub-directories.
$ cd my_django_project
$ ctags -R *.py
Please notice: if you already have a directory with a exact same name as "tags" under "my_django_project", you will get a "ctags: Failure on attempt to read file : Is a directory" error message. You can either rename your "tags" directory to something else, or change the location where the tags file will be generated. This is not within the scope of this blog but you can find more details here.
ctags can be configured to skip indexing certain types of code. The following command has ctags skip indexing python import statements.
$ ctags -R --python-kinds=-i *.py
To see what else can be skipped, type:
$ ctags --list-kinds=python
In ~/.vimrc, bind F8 to ctags command so we can re-generate tags on the fly.
nnoremap <F8> :!/opt/local/bin/ctags -R --python-kinds=-i *.py<CR>
In MacVim, type :TlistToggle to open the tag list. Use <C-ww> to switch between windows, <C-]> to jump to tag when the cursor is over a word, and <C-t> to go back. Pressing <space> on a function name in the tag list shows the function signature. For a full list of tag list key bindings, check out this blog.
I bound F4 to :TlistToggle.
nnoremap <F4> :TlistToggle<CR>
If you'd like to open tag list on right, add this line to ~/.vimrc:
let Tlist_Use_Right_Window = 1
Omni Complete
If you ever used Visual Studio, Eclipse, or other modern IDEs, you probably already knew what Omni Complete does. Omni Complete is the equivalent IntelliSense or code autocomplete for vim.
Add this line to ~/.vimrc to enable omni complete for python.
autocmd FileType python set omnifunc=pythoncomplete#Complete
The key combo (
inoremap <C-space> <C-x><C-o>
OmniComplete
Task list
It is a common practice for programmers to mark TODO and FIXME in code. The TaskList plugin shows a list of such marks.
Download it here. Copy the vim file to ~/.vim/plugin
Type :TaskList to open the list.
Task list showing TODO
Pyflakes
Pyflakes analyzes Python programs and detects various errors. It is a must-have plugin for me.
Download the plugin here. Unzip it to ~/.vim/
$ unzip pyflakes-vim.zip -d ~/.vim/
PyFlakes
SnipMate
One of TextMate's cool features is snippet. Type "for" then press the <tab> key, a block of for statement is automatically generated. Vim can have the same feature with the SnipMate plugin.
Download the plugin here. Unzip it to ~/.vim/
This video demonstrates SnipMate in action.
FuzzyFinder
Another extremely useful plugin. What does it do? See it your self: video.
You can download it here. The L9 library is also required because FuzzyFinder depends on it.
Type :FufFile to search in files. I added the following line in ~/.vimrc to bind <C-f><C-f> to :FufFile.
nnoremap <C-f><C-f> :FufFile<CR>
In FuzyFinder, type <CR> to jump to deeper directories or open a selected file in the current tab. Type <C-l> to open selected file in a new tab. For more details of FuzzyFinder usage, go here.
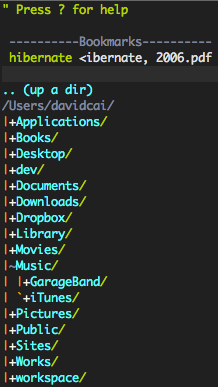
NERDTree
"The NERD tree allows you to explore your filesystem and to open files and
directories. It presents the filesystem to you in the form of a tree which you
manipulate with the keyboard and/or mouse. It also allows you to perform
simple filesystem operations." (Marty Grenfell, vim.org)
Type :NERDTreeToggle to open/close NERD Tree.
In NERDTree, type t to open the file in a new tab. Type :Bookmark
I bound the command to F3:
nnoremap <F3> :NERDTreeToggle<CR>
MatchIt
MatchIt is a handy plugin that lets you jump from a opening tag to its paired closing tag, and vice versa. To see it in action, check out MrTutcasts's awesome video.
Download it here. Unzip it to ~/.vim/
Move your cursor to a HTML tag, e.g. <div>, then type %. The cursor will jump to its closing </div> tag.
Save your fingers
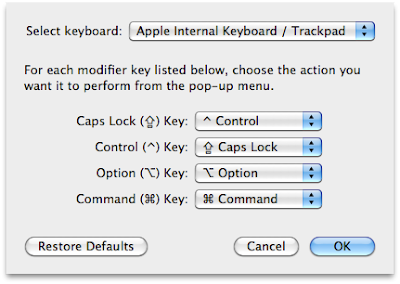
All these wonderful plugins involve a lot of strokes on the Ctrl key. To make your typing more pleasant, it is recommended to swap Caps lock with the control key.
Change the key bindings at System Preferences -> Keyboard -> Modify keys.
Other interesting vim plugins
tComment: toggle comments on one or more lines.
MRU: list most recently used files.
SearchComplete: Tab to complete search words in / search.
SuperTab: Tab to activate auto completion.


Great post! But after I followed your key-binding setup in ~/.vimrc, when I pressed F4, F8, etc, it invoked Mac OS X functions instead of vim plugins. In addition, can you explain a bit what those key combos are, such as , , , etc. Thanks a lot.
ReplyDeleteYou need to change the keyboard settings in System Preference. Enable the option to make Fn keys act like standard function keys.
ReplyDelete4 Nabs:
ReplyDeleteMac OSX LION :
compile with flag '--with-macsdk=10.7'
instead of 10.6
Hi I like this post very much and it is very useful for a beginner like me.
ReplyDeleteCan I translate what you post to Chinese and post it in my personal non-ads blog?
I will put the reference in the beginning of the post!
Thanks!
Sure. Myself is a beginner too. Glad to share some knowledge with my programmer fellows in China.
Deleteawesome post! I fell in love with Vim again! just setup'd my vim
ReplyDeleteThank you
Great post. I was able to set up my python editing environment now. I feel I would love vim :)
ReplyDeleteI am new to all of this. I installed git and followed the directions above. However I get the following error:
ReplyDeleteconfigure: error: no acceptable C compiler found in $PATH
Do I need to install a C compiler?
Thanks!
Hi Anonymous,
ReplyDeleteI guess you might need a Xcode from APPL with command line tools installed on it. Then it will have the gcc.
Thanks!
Great post!
ReplyDelete"colorscheme mustang
is the " a typo?
Thanks for the post. However, although I could install vim with cscope and python26, I cannot install macvim with cscope and python26. I get these errors why trying to do so:
ReplyDeleteError: Checksum (rmd160) mismatch for MacVim-7.3.snapshot66.zip
Error: Checksum (sha256) mismatch for MacVim-7.3.snapshot66.zip
Error: org.macports.checksum for port MacVim returned: Unable to verify file checksums
Installing macvim alone is no problem though. Do you have any idea how to fix it? Thanks,
thanks mate, PyCharm is now obsolete :)
ReplyDeletePaint para Mac - Paint Tool SAI Mac such as MyBrushes and MyPaint is worth considering when digital painters need Paint Tool SAI for Mac
ReplyDelete